

BLUF- Bottom Line Up Front- Came 3rd
out of 32 players (?34-36)
Discussion
Format
Report- EN list, Deployment, Turn by Turn
Fix- critical failures
Sustain
Improve- done correctly in places but not
well.
GLOSSARY
COG- centre of gravity
CC- critical capability
CV- critical vulnerability
EN- enemy
FR- friendly
FLET- forward line of EN troops
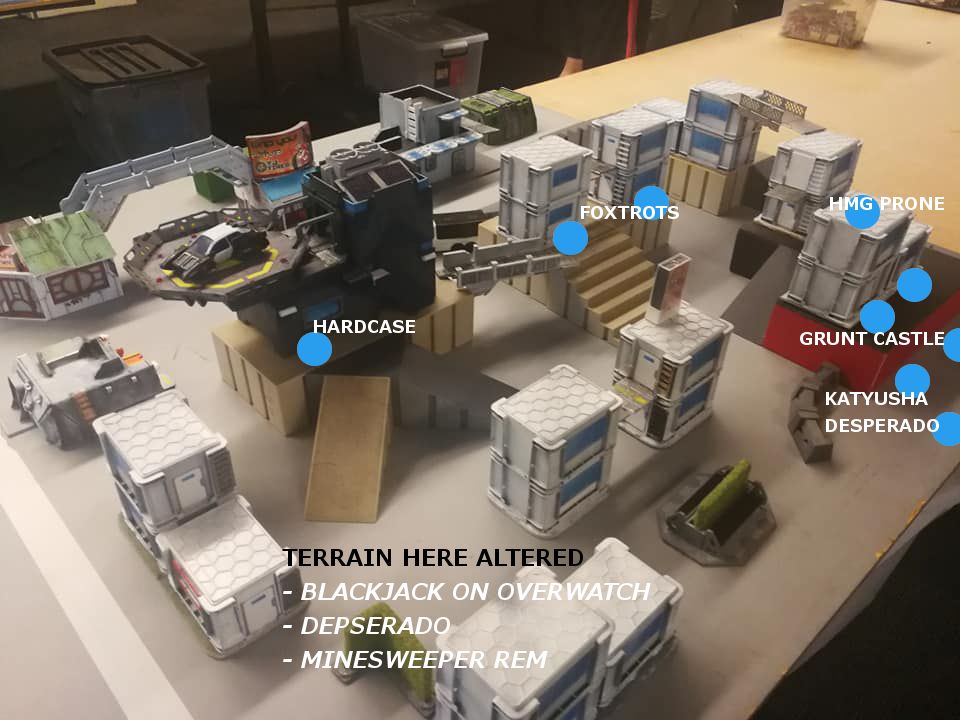
The reports are based on memory with the
help of some photos gleaned from the Infinity Australia Facebook page. There will be inconsistences (especially with
the photos which were taken at different rounds of the tournament when terrain
had been adjusted) that I hope I’ve been able to get around with some labeling. Knowing how unreliable my memory is, I’ve
tried to record it all as accurately as possible but don’t be surprised if some
the details don’t add up- the report will really only give you a gist of what
happened.
CONTEXTUAL
DIFFERENCES CONTRIBUTING TO SUCCESS
-
mission selection
-
“Classic” infinity
o no split deployment,
o not relying on destroying terrain/ looting etc.
-
Good tables- see terrain-
generally well balanced (maybe a touch dense?)
o Not one sniper nest that can see into the entire deployment zone
-
HIGHLY CLASSIFIED- key swing mission
for Ariadna
o “good” classifieds that meant I had a possibility of winning rather
than playing for a draw
-
Match ups generally favourable
o Familiarity- with CC and CV in most cases.
MY
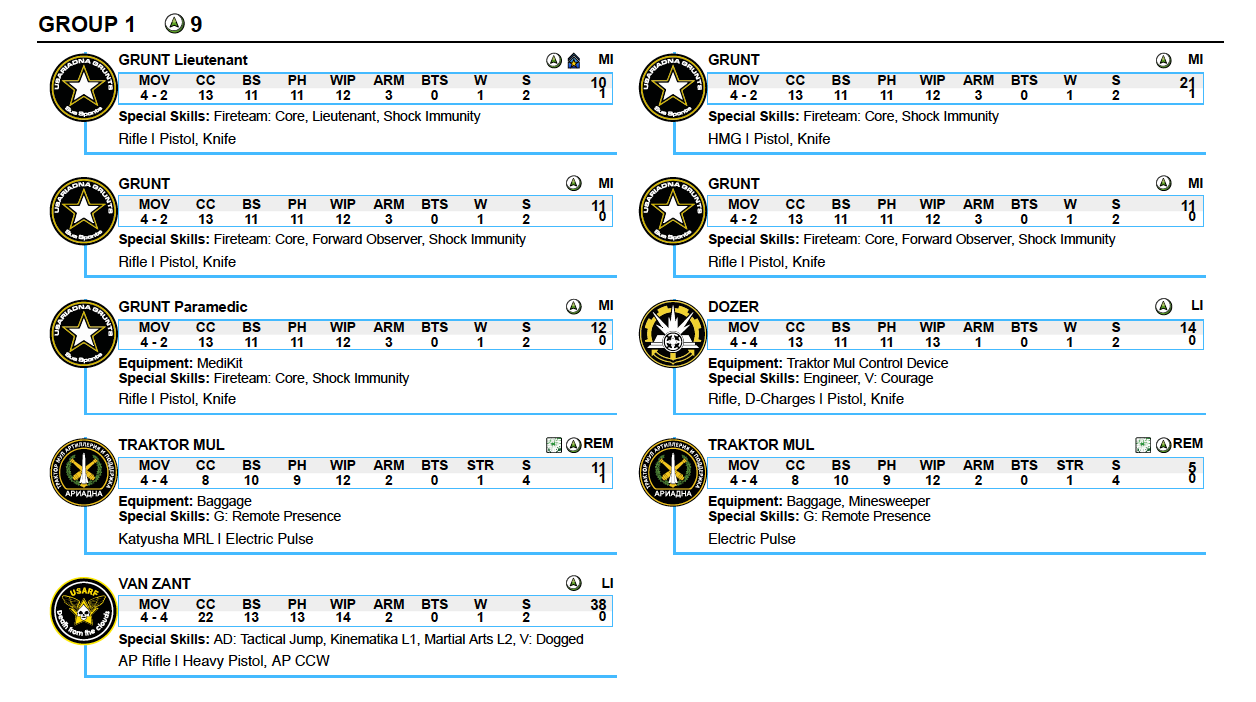
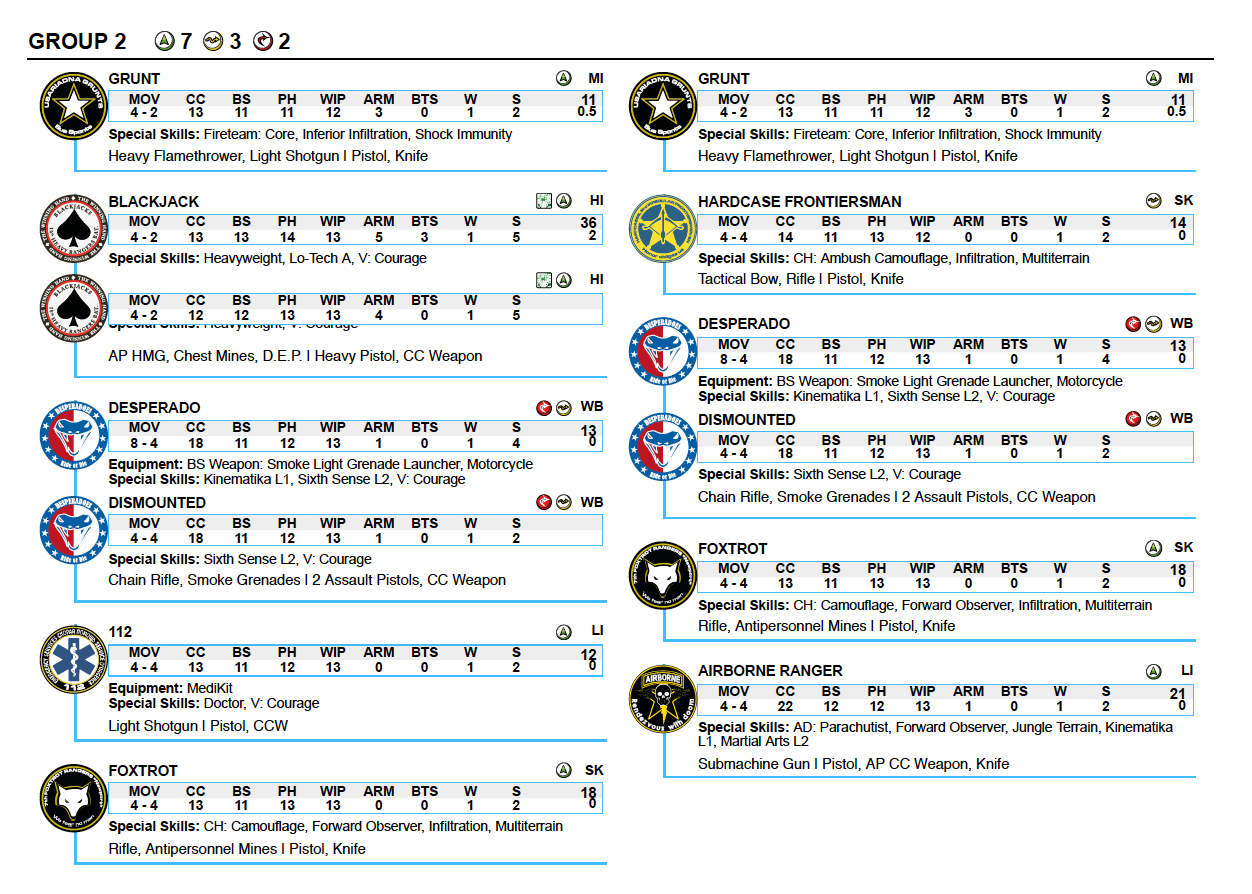
LIST- "BATEMAN’S 300"
COMBAT GROUP 1
COMBAT GROUP 2
GAME 1- SUPPLIES- EN: ISS
LIST
-
Kuang Shi + CG link
-
Rui-Shi x2
-
TR Bot
-
Holo-Echo Bot
-
Sophotect
-
Ninja KHD
-
Merc sniper
-
CG
-
CG Hacker
-
Sensor bot x2
-
Warcor
TERRAIN
& DEPLOYMENT
I lost the Lt. roll off and ISS picked
deployment side and made me deploy first.
The board was dominated by two main streets
which ran from each deployment zone to the other.
The three supply crates stood along the
centre line- and I noticed that the centre crate was effectively shielded from
approach from the ISS side. An alleyway
between the two buildings in the centre of the board (in front of the Kuang-Shi
skirmish screen- see later)- was blocked off.
My midfield skirmishers would be effectively protected from any AROs.
There were plenty of covered positions for
VanZant and the Airborne Ranger to come on out of view so I was quite happy
with the terrain.
USA Deployment
Both my infiltrating Grunts failed their
rolls- trying to position in nuisance spots on the centre buildings.
I put my Grunt link castled up on the roof
of some buildings on the right flank.
My Foxtrots I placed close to the centre
and left supply box (but still in cover).
My Hardcase and his Ambush Camo
marker I put on the main street leading to the Grunt link as a picquet.
The Desperadoes I placed on each flank to
give me flexibility in choice of attack direction.
I put my Blackjack as my reserve on my left
flank in order to be able to threaten the other main street.
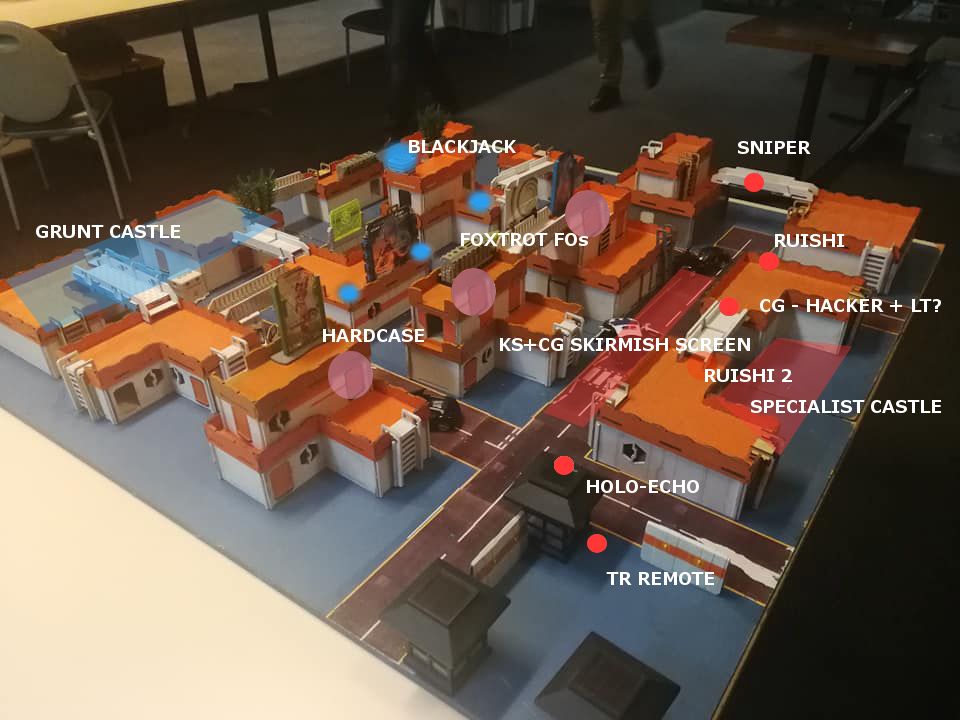
ISS Deployment
ISS deployment was in a defensive
castle.
The EN specialists (Sophotect and Celestial Guard hacker) were
well protected in their centre, covered with REMs (including a Ruishi) and a Kuang-Shi +
Celestial Guard skirmish screen on the street immediately in front of
them. Prone on the roof were a Celestial
Guard hacker and presumably a Celestial Guard Lt.
Protecting the EN right flank- staring down
the street where the BlackJack was- was another Ruishi. A mercenary sniper was placed on a gantry on
the same flank.
Guarding the EN left flank, facing off
against the Grunt castle, was a TR remote, and a Liu-Dan (holo-echoes
deployed).
TURN
1
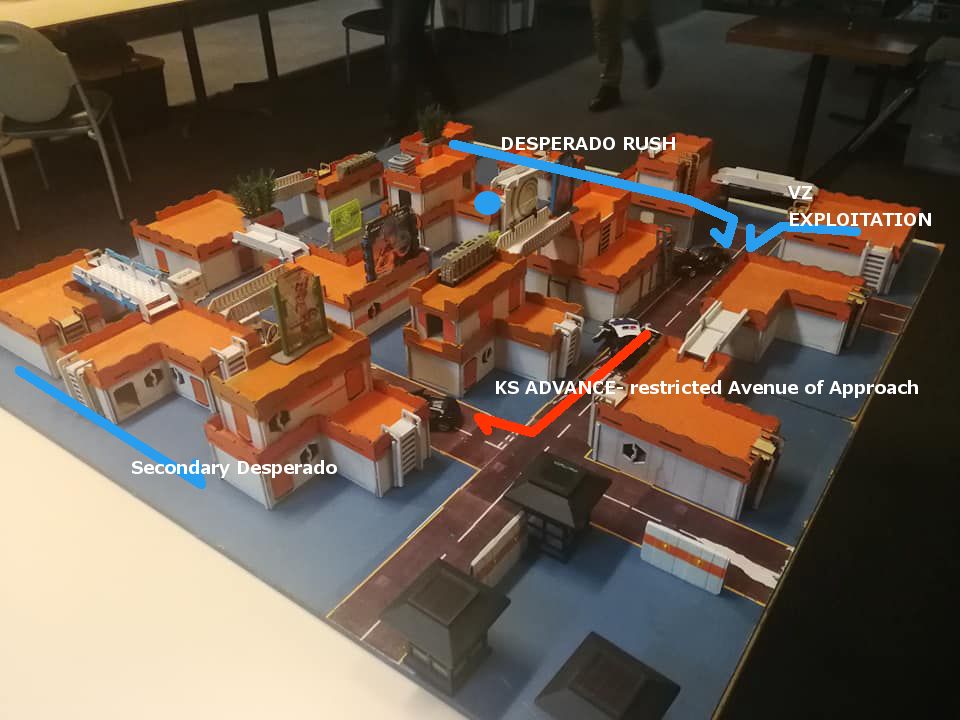
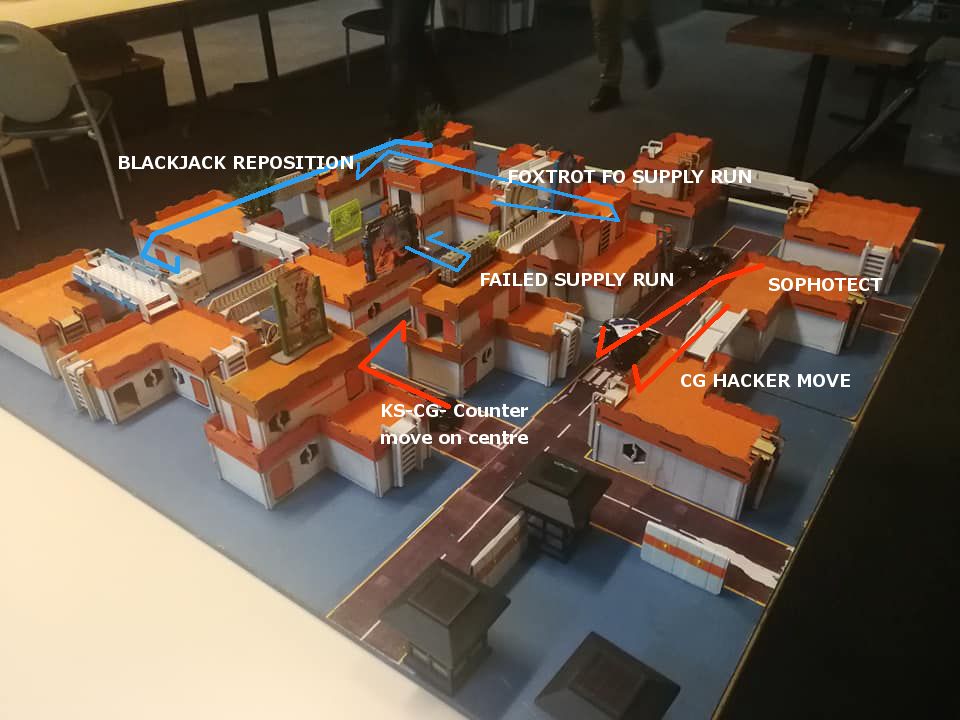
USA Turn 1
Seeing the Kuang-Shi skirmish screen in the
open on the ISS right and worried somewhat by the Holo-Echos and TR bot on the
ISS left - I aimed to take out the ISS right flank.
My Desperados raced up both flanks and
patiently waited for an opening. My
leftmost Desperado hosed the sniper on the ISS right flank down with his double
assault pistols and salivated at the idea of being able to catch the Kuang-Shi
link team under a chain rifle template.
But I needed to make a space for him to go
first. My leftmost Foxtrot slid into
view of the Ruishi on the ISS right flank and did a surprise Forward Observe
which was successful. I followed it up
with a Guided artillery strike from the Katyusha catching a Kuang-Shi and a
nearby helper bot in the blast.
The Ruishi was duly taken out of action as
was the helper bot. The Kuang-Shi took a
wound and went dogged.
Racing around the corner- the Desperado
laid down a chain rifle template- catching the dogged Kuang-Shi and another
member of the link team but I was a centimeter short of the Celestial Guard
controller. The link team blazed away in
ARO and killed the Desperado outright.
It wasn’t all in vain though, as another Kuang-Shi dropped
unconscious.
Hoping to reinforce the attack- VanZant
wandered on the same side, turned a corner and was promptly critted by the
dogged Kuang-Shi’s pistol. I was a bit
disappointed- but made VZ dogged- walked him further around the corner and
threw all my shots into the Celestial Guard controller who elected to shoot
back. The dice didn’t go my way and VZ
was dropped where he stood.
My Grunt HMG stood up- hoping to deal with
that TR bot down the street- and starting a trend for TR bots at this
tournament- got crit in the face for his trouble.
It wasn’t a great turn- the left flank
alpha strike failed to materialize AND I hadn’t managed to get any supply boxes
either.
ISS Turn 1
The Sophotect made some quick moves around
to the downed Ruishi and attempted a resurrection. I kicked mentally myself for not finishing
off the Ruishi properly. I clearly
needed more coffee this early in the morning- I wouldn’t forget that
again.
Luckily for me the Sophotect failed! But she continued on her jaunt- resurrecting
an unconscious Kuang-Shi and claiming a classified.
Reforming the Kuang-Shi link team- they
snaked around the ISS leftmost main street (Maybe the smoking remains of
VanZant put them off going the other direction).
Smoking their way towards the nearest
supply box- the TR bot and maybe the second the Ruishi moved into better
positions to help out. My Hardcase and remaining
Desperado found themselves on the receiving end of some ISS love and were taken
off the table.
Finally the Celestial Guard hacker moved
into a better position on rooftop gantry.
TURN
2
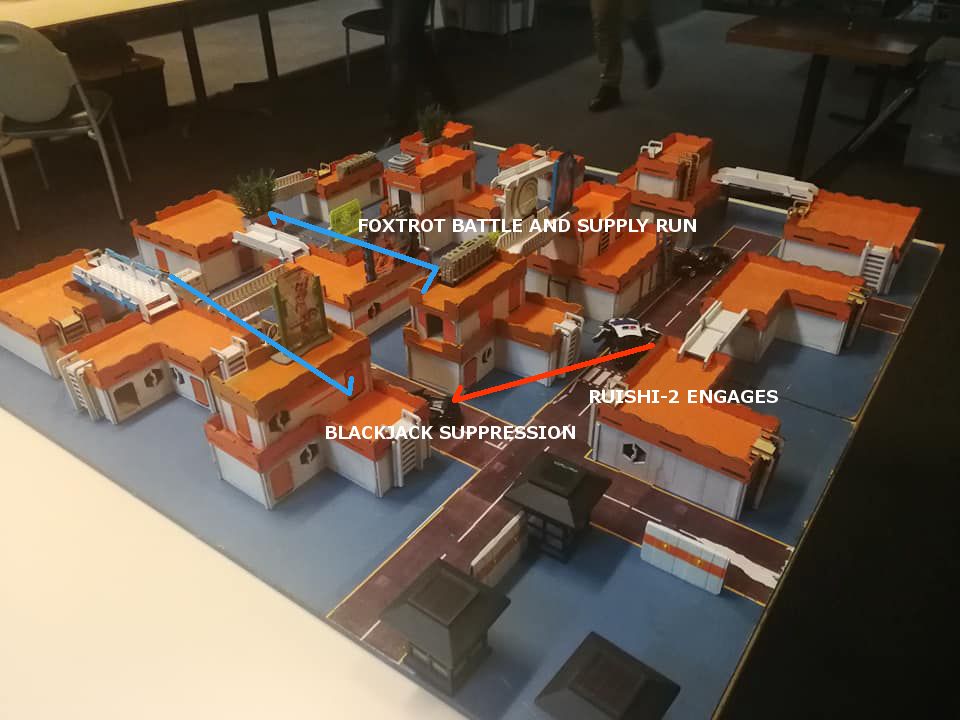
Turn 2 USA
I was down 0-1 and needed to get some
points on the board.
First thing I did was move the BlackJack to
my main pool (Grunt order power!). I had
lost my HMG and needed a high burst weapon to utilize those orders.
I sent my leftmost Foxtrot into the closest
supply box- grabbed its contents on a successful WIP roll (phew) and raced back
into a sheltered nook in my deployment zone.
My centre Foxtrot tried to access the
centre supply box- but was denied hard on a crappy WIP roll (18 or
something). Doing the whole “move 2”
there, 2” back” and activate meant I was closer to total cover which worked out well because I had run out
of orders to recamo (which would have been my preference).
Then I began the laborious process of
walking (ambling?) the 4-2 Blackjack from it’s position on the other side of
the board to face off against the threatening Kuang-Shi. He did some good shooting- knocking out a
holo-echo (see rules clarification) and then the actual Liu-Dan itself.
Turn 2 ISS
The Celestial Guard controller moved up to
a supply box, losing a Kuang-Shi in the process to the Blackjack. A quick check of the mission and the army
list found that only specialists could access the supply box which a CG
Controller is not. With that determined
the Kuang-Shi moved to contest the centre supply box instead.
The Sophotect and the Celestial Guard
hacker now made a bee line for the two remaining supply boxes.
TURN
3
Turn 3 USA
I needed the centre supply box and it was
being guarded. The Celestial Guard
controller and a Kuang-Shi were lined up against the wall (around the corner
from the Foxtrot who failed getting the supply box last time).
Moving just shy of the edge of the corner-
the Foxtrot FO dropped a mine. His next
order, he came around the corner and was able to just see the Celestial Guard
controller and fired.
There are no good choices in situations
like that and the Celestial Guard dodged.
The Foxtrot killed the Guard and the mine caught the dodging Kuang-Shi
in the blast (who didn’t pass his dodge and failed his armour roll).
With that out of the way, the Foxtrot FO
made it to the supply box, extracted the supply and raced home.
To try an deny access to the last supply
box- I marched the Blackjack down the street- killing the Celestial Guard
Hacker up on the rooftop before going into suppression.
Turn 3 ISS
There wasn’t a lot that could be done to
swing the game back- but the last Ruishi gamely advanced on the Blackjack. Finally turning a corner, it was turned into
swiss cheese by the Blackjack but it let loose with it’s heavy flamer… and
roasted the Blackjack into unconsciousness.
Minor win
KEY
LESSONS:
Fix
1.
Ensure the kill- ESP on Remotes.
Sustain
1.
SURPRISE FO/ Artillery strike
a.
Works when you are B2 vs B1
b.
Works better when it’s
unopposed
2.
Mine and shoot tactic
a.
Order intensive but gives the
“bonus” mine strike to usual shooting
b.
Hard choice for reactive player
dodge or shoot
c.
Disadvantage in that you won’t
get cover typically (you laid the mine on the corner)
Improve
1.
Never allow more than 1 ARO at
a time.
a.
Desperado rush should have been
a steady 5 dice DAP vs one ARO at a time.
b.
Racing out and attempting to
chain rifle multiple targets has it’s place but in this case the chain rifle
targets were not that bunched up and ended up being poor yield.
GAME 2- Frontline- EN: OCF
List
-
Sphinx
-
Rodok link with ML + Samaritan
-
M drone
-
Q drone HMG
-
Ikadron x2
I have no photos and will do my best to
describe what happened.
Won Lt- picked deployment (hoping opponent
would go first). I went second.
Deployment
The Rodok link deployed in the centre of
their deployment zone (the only place with total cover from AROs). The two drones watched their left flank-
where there was relatively open terrain.
The Ikadrons took up positions on the extreme left and right flanks.
Seeing this- my infiltrating grunt made his
roll- being able to stare down the Rodok missile launcher.
My midfield skirmishers took the heights on
the buildings between the two deployment zones- weighted on my left.
Why left?
My left was where I decided to castle
up. It had the most buildings and I was
able to hide most of my link team and specialists inside- prone. Roof tops are useless with super jumping
Rodoks around but to make sure it wasn’t all going to be their way- I left two
FO Grunts on the roof top to hopefully blind any Rodoks that got close. Rodok shotguns would make short work of the
men in the buildings so they couldn’t have free reign.
The reserve Sphinx took up position on the
Rodok right- directly opposite my castle, where it could utilize it’s climbing
plus to good effect on the tall buildings- and engage my link team directly.
Having run out of places to hide on the
left- my reserve Blackjack hid off in a nook on the right- wary of Rodok
missile launchers and the Sphinx.
TURN
1
Turn 1- Onyx
Recognizing the infiltrating Grunt as the
threat he was, the Q-Drone HMG moved to get line of fire. One of my Foxtrots watched it all happen and
I did weigh up the possibility of shooting the REM. But at poor range and with the REMs mimetism-
a Foxtrot B1 hitting on 5’s didn’t feel like great odds.
Electing to do nothing, the Foxtrot was
discovered by Q Drone. Sweating at the
thought of the Q Drone hosing him down- the Foxtrot dodged prone at the next
order.
The infiltrating grunt didn’t get to live
up to his nuisance value as the Q drone nudged around a corner beyond 16” and
blazed away. The Grunt failed his dodge
and was killed outright.
With the Grunt’s heavy flamer out of the
equation, the Sphinx confidently raced forward, climbing over the buildings and
finding himself on the roof of a two level building staring down into my Grunt
castle.
It claimed a Hardcase on the way, who
sacrificed his life to discover it (in hindsight a poor choice on my part to
reveal him).
My second Foxtrot- sharing the roof with
the deadly TAG- refused to drop out of cover.
I figured a single rifle/ pistol ARO just wasn’t worth the value an FO
had on my active.
The Sphinx- spying the Grunt FO’s on the
roof- blazed away for 3 orders. Not
fancying themselves much good at flash pulsing with a -9 modifier (ODD + cover)
they vainly attempted to dodge. A total of 7 hits were made on the Grunts but
they all passed their armour saves!
With luck like this- who needs tactics!?
USA Turn 1
My Desperado’s charged towards the Sphinx-
one being taken out- the other making his smoke roll.
I had to get rid of the Sphinx and the
Foxtrot sharing the roof with the Sphinx (and behind it’s arc of vision) got
the job. Materializing and attempting to
FO the Sphinx should have been a reasonably good odds- 2 dice on 7s vs. a dodge
on -6 (REM and TAG).
Sadly- 6 orders later- the Sphinx had
somehow avoided being observed and an overwatching Rodok took advantage of the
fact the excited Foxtrot was standing up over the parapet and burned him to
death. I really should have deployed my
Foxtrots prone.
Time for plan B.
Walking on my Airborne Ranger FO (in the
Sphinx’s back arc and beyond 8”) I got a successful Forward Observe. Finally!
(Unopposed rolls are the best).
At this point the Katyusha started dropping
guided rounds on the Sphinx (hitting on 13s due to the ECM penalty). 5 orders later- the TAG crashed down in a
crumpled heap and I heaved a great sigh of relief.
Hoping to initiate a new front- VanZant
walked on and shot at the Rodok Missile Launcher who didn’t have cover from the
rear. 3 dice on 13s vs. 2 dice on 12s (cover penalty) seemed like good
odds.
Luck followed my good odds- I critted the
Morat missile launcher and my other two dice put the alien into the dead state.
Looking for some low hanging fruit- VanZant
shot down an Ikadron facing the wrong way.
Then wary of the Rodoks close by, retreated back around a building and
went into suppressive fire.
TURN
2
Turn 2- Onyx
The Samaritan is a beast. Throwing smoke to get within 6” of VanZant-
it used it’s next order to idle (forcing me to choose only change face or idle
as ARO)- and then calmly walked 6” into base to base combat with it’s second
short skill.
I was hoping VanZant would crack out his
nice Martial Arts and do a winner- but Protheion L4 (meaning the Samaritan was
throwing 2 dice) to my 1 made it much less likely. Needless to say, VanZant took a wound (and
gifted one to the Samaritan from the Protheion skill) and then promptly died
(and gifted ANOTHER wound to the Samaritan) when he went dogged.
Now completely buffed up, the Samaritan
launched his way over towards the Grunt castle- shooting down the impudent
Airborne Ranger who had been such a pain before and landing firmly in the
“Endzone” (for OP scoring purposes).
Having secured the endzone with the
Samaritan- the last Ikadron snuck forward to claim the near zone.
Turn 2- USA
Since Impetuous orders must go first, my
last Desperado charged towards the Umbra- Double Assault Pistols blazing. Even with a 5 dice attack, getting within 8”
of an Umbra is pretty risky as I soon discovered.
Electing to throw his Vorpal Close Combat
weapon (PH 12 +3 for range) it took 4 orders to kill the Samaritan (he also has
NWI to boot).
With the Samaritan down, the Grunt link
walked forward into mid zone. Unfortunately
due to the density of the terrain, my B5 HMG wasn’t able to draw any line of
fire to the Rodoks, so Grunts carefully picked their way down my left flank.
Aware of the importance of baggage, I
finally moved my Blackjack out of total cover to kill the final Ikadron.
TURN
3
Turn 3- Onyx/ USA
Utilizing the Morat Veteran skill, a single
Rodok made his way to the middle zone aiming to cut off any movement from the
Grunts slowly advancing.
With the start of my turn- the final
Desperado died to the Rodok but the Grunt link 5 diced the Rodok to death.
Having become a bit carried away in the
game I had lost track of EN movement. I actually thought that my high scoring
end zone was being contested by the remainder of the Rodok link. Doing a quick mental calculation- I figured
it was pointless trying to put a 21 point Grunt HMG into a zone populated by 30
something point aliens. (This actually
was not the case – but counting my blessings- Grunt ARM saves! Airborne FO!- I
couldn’t complain).
I had the near zone and the middle zone,
and presumably the EN held the far zone.
That was good enough for a win.
So with that we stopped the game.
Minor Win.
KEY
LESSONS
FIX
1.
Camo against Onyx- total cover
from FLET standing up, otherwise be prone.
a.
I’m finding that using the CAMO
markers as “speed bumps” to an EN advance is a net loss overall e.g. Foxtrot FO
attempting to observe the Sphinx whilst standing up and dying from a Rodok
missile in the process.
b.
Using CAMO markers to be in
total cover from the EN deployment zone AND “facing” towards the FR deployment
zone may still have a role (shooting EN figures in the back if they advance too
far.
c.
Otherwise they won’t survive
reactive (discover is typically on 12+3= 15) base from a link team. Or Sensor.
IMPROVE
1.
Suppression
a.
Better used when you have a
clear zone of at least 6” to prevent CC
SUSTAIN
1.
FRONTLINE TURN ORDER- going
second for Frontline worked out well.
a.
If you can survive the alpha
strike you can dictate tempo.
b.
If forced to deploy first… then
the risk of going second is too high- and performing a good alpha strike is
pivotal.
2.
Recognize the importance of
Baggage for zones.
a.
I didn’t take advantage of it-
but I kept it to the forefront of my mind.
b.
Made it a priority to knock out
the Ikadrons
3.
FO-Artillery Strike-
a.
Preferred method of taking on
hard to hit prized targets that I don’t want to risk my Blackjack or Grunt HMG
b.
GUIDED (ECM factored in) with Katyusha:
i. JOTUM ARM10- Dice calculator- 24.9% wound/s
ii. MARUT ARM 8- Dice calculator- 39% of wound/s
iii. SPHINX ARM 6- Dice calculator- 51% of wound/s
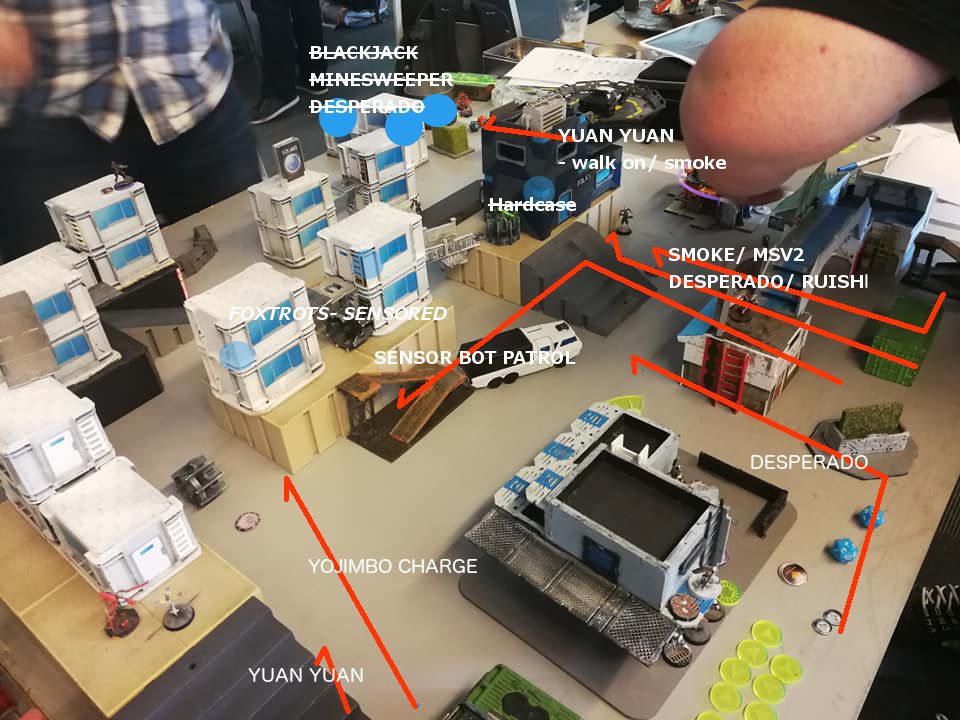
GAME 3- SUPREMACY- EN: IKARI COMPANY
List
IKARI
-
Yojimbo + 2x Crazy Koalas
-
Desperado Double Assault Pistol
x2
-
Yuan Yuan x2
-
Ikari Link: Keisotsu x3 (one
with) HMG+ Tanko ML +Brawler MSV2 snipe
-
Engineer with helper bot
-
Baggage bot x2
-
Sensor bot with combi
-
Ninja with combi rifle
-
Ruishi
-
Brawler Lt.
Lt. won roll- went for deployment (hoping
to get second turn). I did.
DEPLOYMENT
I selected the edge that had the most
elevated terrain (to deny them to the EN basically) and made the IC deploy
first.
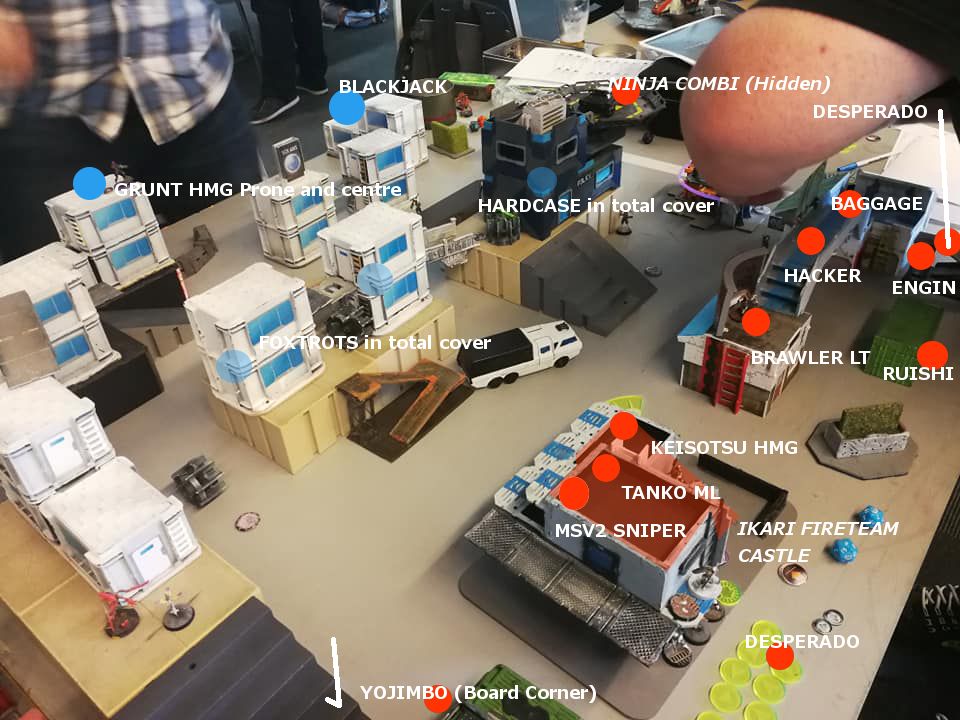
The Ikari link took up position on the
tallest structure (ah-ha! I knew they’d do that!) in their deployment
zone. The Tanko ML and MSV2 sniper took
the highest level, the Keisotsu HMG was the next level down and the two weenies
hid in the back side of the building in total cover.
The other main structure (a big walkway
between two single storey buildings was where the Ikari Company hid their
Lieutenant, their hacker and a baggage bot.
An Engineer and her bot hid behind the structure on street level.
A Desperado and Yojimbo took position in
the far corners on the extreme flanks and the second Desperado took position in
the centre. The smoke coverage was going
to be complete.
Finally- the Ikari reserve (a Ninja combi
rifle) hid out the landing pad next to the police car.
I broke my own rule I admit. I don’t usually put troopers out to ARO- but
the possibility of bagging a Desperado was too much.
First of all- I found the only defensible
corner and defended the heck out of it.
Both my failed infiltrating Grunts, my Grunt link team, my 112, my
Katyusha and a Desperado hid out on various levels on the structure or at its
base. My Grunt HMG was positioned prone
in the centre of the tallest point (and thus with no direct lines of fire).
My skirmish screen I mostly positioned in
total cover facing towards my own lines.
I thought I would be highly unlikely to stop a Rambo charge of 3 bikes
and would need to shoot them in the back if they got too far.
A dozer was hiding amongst some total cover
in the centre of my line and on my left- I positioned a REM and another
Desperado.
Finally I positioned my Blackjack out to
stare down the only way the far Desperado could move in his 8”. This was a mistake as you’ll soon see.
TURN
1
Ikari TURN 1
They were all over me like white on
rice!
The Desperados raced forward- easily making
their requisite smoke rolls for blanketing the entire area in Smoke. My Blackjack snapped off a single ARO and
missed- bless him- before finding everything in front obscured.
Yojimbo charged forward almost to the
midfield- his crazy Koalas all well within reach of my two Foxtrots.
With that Yuan Yuans started to drop. One failed his drop and walked on the Ikari
board edge to support Yojimbo.
While I wondered which one would be pushed
forward to wreck face, a Yuan Yuan walked on the edge close to the
Blackjack. They’re only armed with chain
rifles right? I was oblivious to what
was going to happen next.
The Yuan Yuan threw some smoke- killed the
helpless REM and then killed the Desperado.
The Desperado’s return shot with his chain rifle put the annoying pirate
down but the damage had been done.
With all the smoke thrown- the Ruishi with
it’s MSV2 trotted up to some cover (and a good range band) and hosed the
Blackjack with it’s Spitfire. I tried to
dodge- and failed- and died to a crit and two other hits.
That is why I try to not to leave units out in ARO.
With my left flank now non-existent, the
Ikari sensor bot ran forward and sensored my Hardcase (and who was immediately
killed by the Ruishi using the smoke MSV2 trick).
The Sensor bot continued it’s annoying
patrol, sensing my Foxtrots and then moving over to a console to flip it. Some luck went my way (finally!) and it took
the REM two orders to do it.
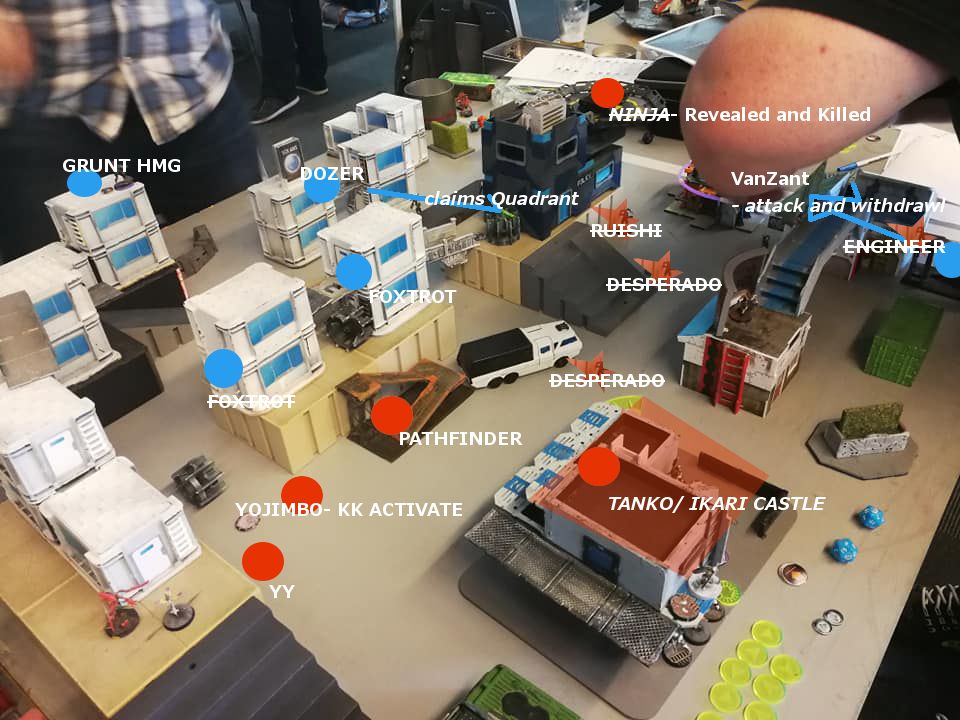
USA TURN 1
Keeping with form of how things had gone so
far, my last Desperado raced forward and found himself on receiving end of a
Tanko missile launcher. He lost the face
to face and evaporated (much like my left flank).
Still when things start off a bit poor- you
can always pick a few low hanging fruit.
Firstly- one of my Foxtrots dodged on the
spot- hoping to entice the nearby Koalas.
He failed his dodge roll and the two buggers obliterated him much to my
disgust.
Not a great start to getting to low hanging
fruit….
My remaining Foxtrot snuck out to draw a
line to a nearby Desperado and put him down before withdrawing into total cover.
With things going so well (not) I decided
it was time to bring on VanZant. He came
on the far corner edge, killed the Engineer nearby (they failed with dodge
roll) and got me a classified with a coup-de-grace too!
I briefly entertained the idea of running
up on the gantry and killing the Brawler Lt. but the AROs from the Ikari castle
would have made it a pointless exercise.
So sneaking forward, VanZant started plugging models in the bag, taking
out the Rui-Shi and the other Desperado.
I was really chuffed. Sneaking forward another 1-2inches I thought
that maybe I could shoot everyone else who had advanced forward in the back
too!
At this point- the Ninja on the landing pad
materialized. It was either the idea of
VZ claiming a quadrant, or the thought of him getting some unopposed shots at
the Sensor bot (and Yojimbo) that forced his hand. VanZant tried to dodge but lost the roll
off. All good runs have an end… I
thought ruefully but VZ made his ARM roll successfully and withdrew back along
the alley he had used to advance.
The Ninja had revealed though and was looking
the wrong way (and out of cover!!!). You
can’t let an opportunity like that pass and my Grunt HMG on the high tower
crawled to the edge and unleashed his B5 HMG.
The Ninja took three hits and died on the spot. Satisified, the Grunt crawled back into the
centre of his elevated position waiting for the next opportunity.
With Ikari and USA holding one quadrant
each, I ran my Dozer into the quadrant in front of my left flank and into the
nook of a building to claim another quadrant.
USA 2- IKARI 1
TURN
2
Ikari Turn 2
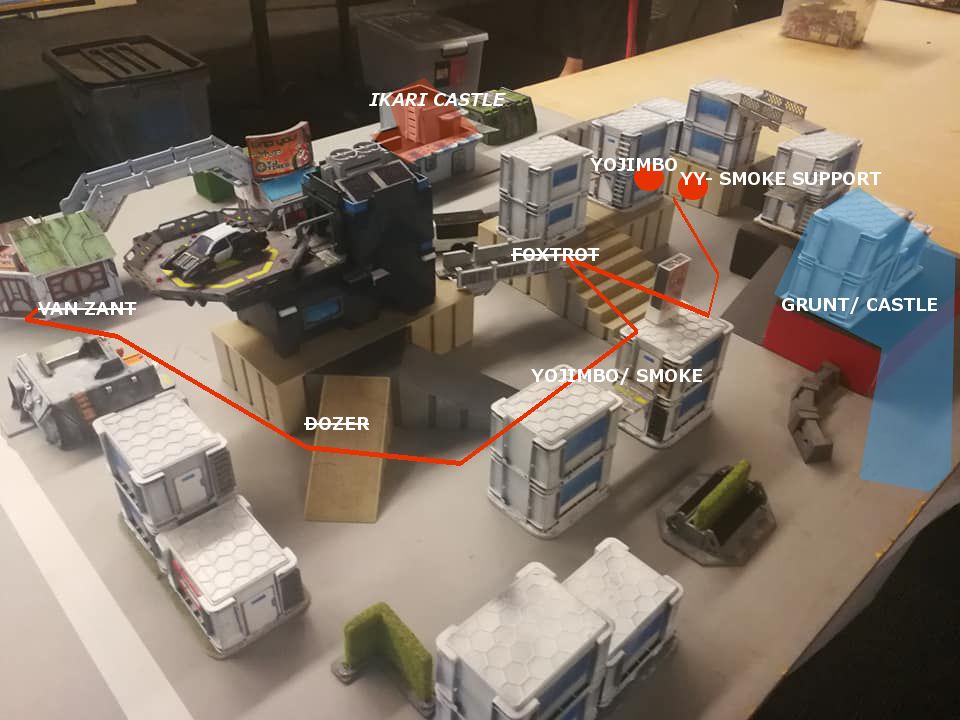
There was lots of smoke.
Yojimbo and Yuan Yuan teamed up to smoke
leapfrog the area directly in front of my Grunt castle. More smoke was launched- completely obscuring
views out of the Grunt defensive position.
Finally some speculative fire smoke was
tossed at the feet of the nearby Foxtrot who quailed at the thought of what was
coming.
Yojimbo has an 8-6 move and he used it go
effect- riding his bike up the steps to swiftly chop the Foxtrot that was
claiming that quadrant into sushi.
With that target taken care of, Yojimbo
raced over to where the Dozer thought he was safe- smoked the area and then cut
him down where he stood.
Yojimbo wasn’t done yet- racing back
towards the EN deployment zone.
Dismounting from his bike out of view of VanZant, he idled once within
4” (forcing a change face or do nothing) and then charged in.
VZ hoped he would get lucky, but sadly he
had used up his nine lives and died at the end of Yojimbo’s katanas.
USA TURN 2
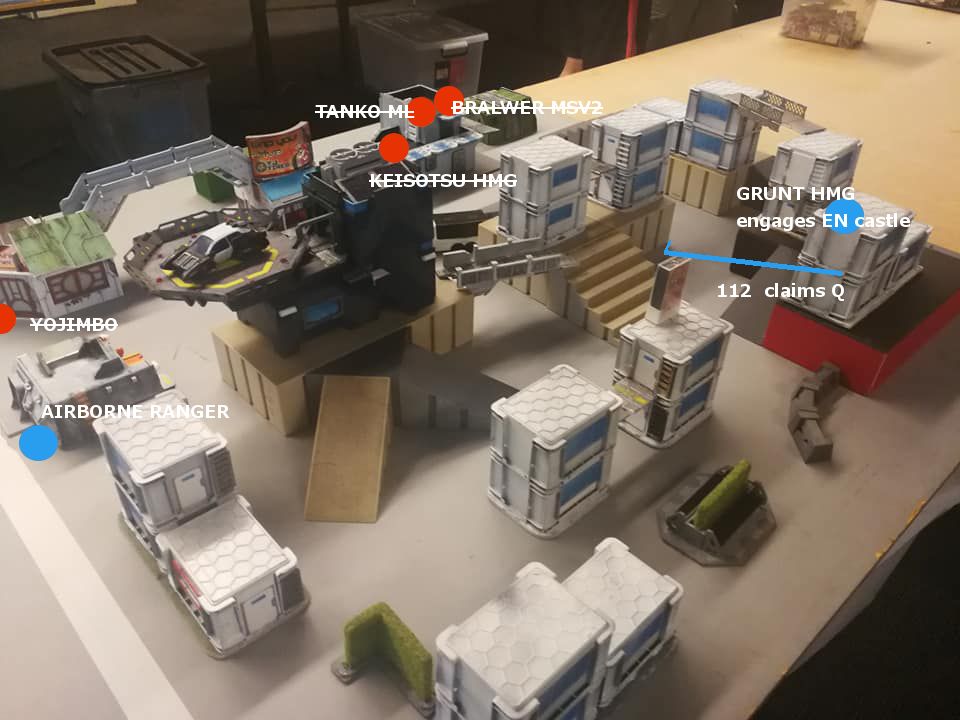
Yojimbo was horrifically effective- but I had
his number. The Airborne Ranger was due
on the left side and I walked him on outside of 8” of Yojimbo and in total
cover from the Ikari link castle.
With Yojimbo facing the wrong way, the
Airborne hit him with shock ammunition and killed him outright (and bagged me a
new quadrant).
The remaining Yuan Yuan left behind by
Yojimbo’s ride around the world was shotgunned by the 112 who also advanced-
reclaiming a second quadrant. The 112
advanced on the nearest console- failed to activate it- but bagged in on his
second attempt.
With the only things left in view being the
Ikari castle- I crept my Grunt HMG forward, engaging each member of the link
team of the roofs piece meal. He killed the
Keisotsu HMG with a crit and a hit. Then
Tanko went down with a crit and hit. Then
finally the Brawler MSV2 sniper was engaged and he went down with a crit.
Three consecutive face to faces. Three crits.
Gotta love 5 dicing!
USA 2- Ikari 1.
TURN
3
With not a lot of choice left, the Brawler
Lieutenant raced across the gantry and engaged the Airborne Ranger, gunning him
down.
With that Quadrant clear, the baggage REM
walked onto the overhanging roof of the building (and into that Quadrant).
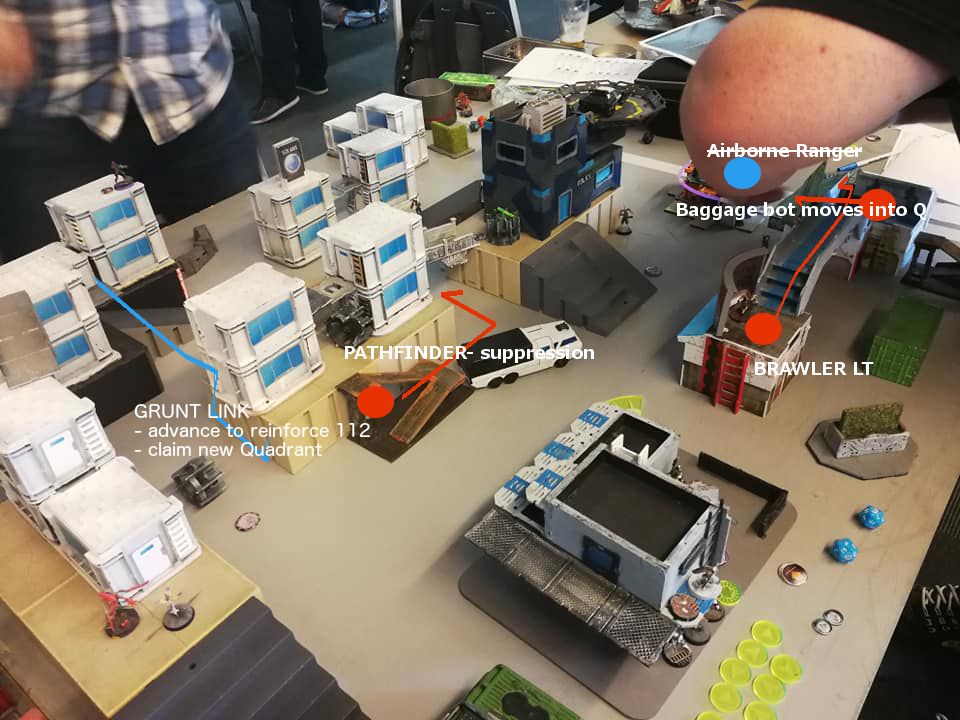
The sensor Pathfinder (only unit left in
midfield) moved around the building and went into suppression- aiming to cut off
movement of the 112 into the next quadrant.
Being able to see the final placements pays
dividends and the Grunt link left its HMG behind- reinforcing the 112 (and
tipping points in that quadrant with the Pathfinder over in USAs favour) and
then two Grunts slowly picked they forward into the Quadrant in front of where
the Ikari Link castle had been.
USA 2- Ikari 1
KEY
LESSONS
Fix
-
ARO PIECES- if it’s not SSL2
snipers/ ML or ODD- it’s going to die in your reactive!!!!
o Poor use of Blackjack.
o Not always true- Jotum or Dragao can survive just from pure ARM
-
EXPECT MSV2/ Smoke trick
o It completely caught me by surprise- lack of playing experience
o The only viable option (unless you’re SSL2 or ODD or MSV2) is to
dodge on your flat roll. Shooting back at
-6 is generally a poor idea.
Sustain
-
going second in Supremacy and QC critical in surviving the Rambo and playing the objectives
-
to try achieve this pick
deployment if you can
-
burst supremacy on active is
key- take down of the Ikari castle good example.
-
VZ- going for low hanging- easy
to kill fruit.
Improve
-
Lay mines when Impetuous models
are close by to stop Yojimbo Rambo
o Cannot lay mine as Yoojimbo engages due to smoke (you only see once
he is in base to base) therefore better to lay it in your active- anticipating
the bike charge
GAME 4- HIGHLY CLASSIFIED- EN: ALEPH (Vanilla)- TOP
TABLE
Sabotage, Inoculate HVT, Extreme prejudice,
Test Run
LIST
Atalanta
Myrmidon officer
Warcor
Netrod x3
Flash pulse Bot x2
Danavas Hacker
Doctor (?not sophotect)
Garuda x2
Posthuman- sniper/ FO
Naga hacker
Naga FO
Lost Lt roll- ALEPH picked first turn.
I forced ALEPH to deploy first.
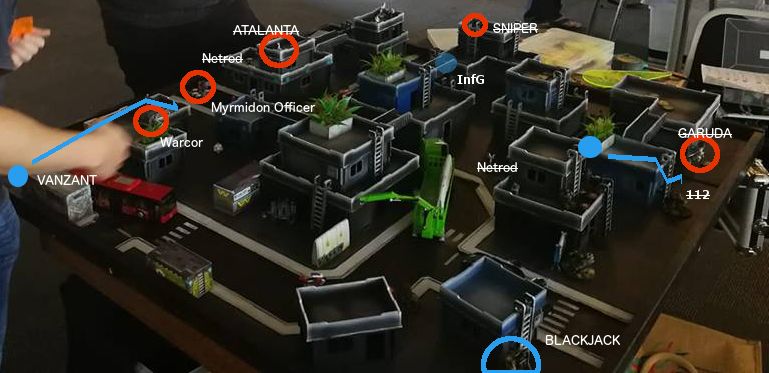
DEPLOYMENT
ALEPH Deployment
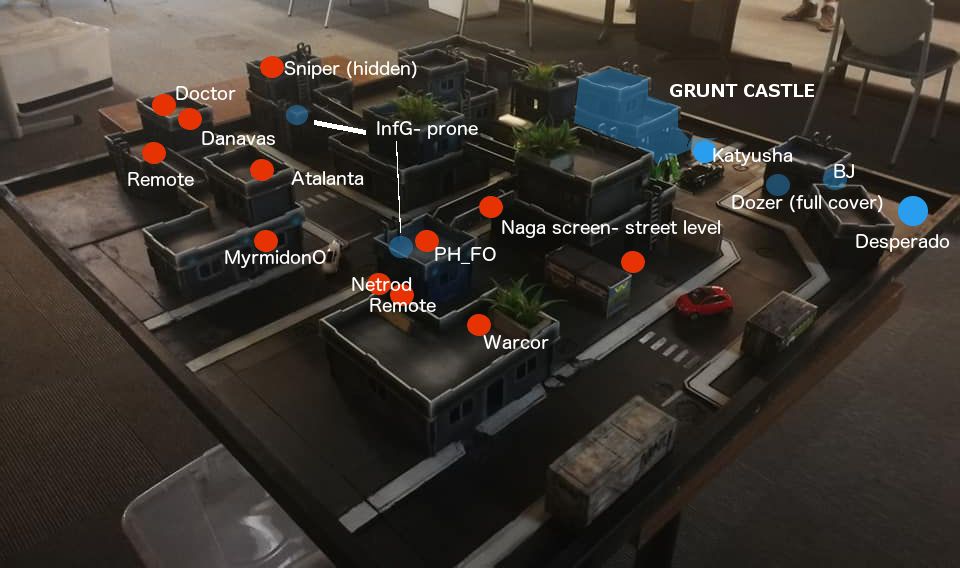
The first clue was that there wasn’t much
on the table.
A doctor, a flash pulse bot and a Danavas
protected their left building (the doctor being prone on the roof).
Atalanta took up position on the roof of
the centre building. A Myrmidon officer
hid in the corner at the base of the building (probably the Lieutenant I was
thinking…).
A warcor stood around a plantar on the roof
of the building on their right.
A posthuman FO was prone on the roof of a
single story building looking to make good use of the walkways to keep cover
whilst advancing into my deployment zone.
Then there were two camo markers in the
midfield.
I suspected something big was one it’s way-
and when after the reserve roll, a hidden deploy model was placed- I knew some
serious AD was incoming.
USA Deployment
Both my infiltrating grunts made their
rolls bless them! One was prone right
next to the Post-Human FO, the other ended up prone opposite the Danavas/
Doctor Tower. (There was a ladder nearby
which meant I could get him to run amok if left alone).
My priority was to stop any landing
zones. I castled up my Grunt Link team
in the most defensible structure- keeping them prone and in total cover on the
first and ground levels.
Then I set about protecting the approaches. My Desperados took up positions on the flanks
(SSL2 and chain rifles!) of the castle and my midfield skirmishers (rather like
the last game) looking rearward toward my lines (and any landing zones).
My 112 I put prone on a nearby roof- he had
a shotgun and if a Garuda wanted to try and go face to face with a +6 mod- good
luck to it.
My Dozer was a fair bit more squishy and I
hid him in on the ground floor of a nearby building in total cover.
Finally I put my Blackjack down well away
from Atalanta but with some ARO to some nearby landing zones.
TURN
1
ALEPH Turn 1
The Myridon officer walked out of his hide
at the bottom floor of the double storey building and threw from smoke to cover
the scene. Atalanta took advantage of
this with her MSV2 and started claiming scalps.
The first one was the infiltrating Grunt
covering the Post Human FO. Instead of
dodging, I gambled on using the heavy flamer- which stopped a centimeter short
(damn it). Then Atalanta continued to
dance along the rooftop- discover shooting every other camo marker I had visible-
claiming my Hardcase and my Foxtrot on my far right.
Eager to claim a classified to get some
points on the board, the Posthuman FO walked forward- and Coup-de-grace’d the
infiltrating Grunt that Atalanta had taken out.
With a boost from the Danavas, the Garuda
airborne deployed on my right flank.
Recognizing how deadly a Garuda with a boarding shotgun could be, my REM minesweeper
attempted to engage (and unsurprisingly failed). As the Garuda advanced, the REM vainly
attempted to engage (and was eventually knocked unconscious for its troubles)
and the Desperado responded with smoke throws (some which were
successful!). The two of them had
sucked up enough orders though and then Garuda charged out of the smoke and
knocked the Desperado out- it could do no more damage.
USA Turn 1
It wasn’t a stellar turn 1 so far- losing
my midfield to the Smoke/ MSV2 tactic had turned out quite costly- and I had let
the Garuda into my backfield. Still- I
had absorbed the alpha strike and it was time to hit back.
Impetuous orders go first, and my
surviving Desperado drove into view of the Warcor who promptly blinded
him.
So much for that alpha strike.
With that out of the way, my Blackjack shot
at the exposed Garuda and took him out with 3B.
The other B was directed at the Warcor- which did nothing. (This Warcor was proving very annoying).
Unable to do much with Atalanta dominating
the fire lanes, I walked VanZant onto a flank.
He spied the Myrmidon officer and shot him in the back- twice! He annoyingly passed his ARM rolls though and
electively ducked back into some cover (and out of view).
Looking for some low hanging fruit- VanZant
took out a netrod- before carefully picking his away along a wall and engaging
Atalanta. He won the face to face roll-
and knocked her unconscious.
I wondered about trying to take out the
Myrmidon Officer- but -9 to hit (-6 in a good range band) on BS 13 wasn’t
really that appealing (especially when he could Nanopulser me back). Deciding to try and keep VZ alive and
annoying, I climbed him onto the roof with the Warcor and tried to shoot him-
and missed all my shots. Bloody Warcors.
Well at least with Atalanta down and out- I
had some freedom of movement. My 112
climbed down a ladder from his roof position and made his way towards the
fallen Desperado. He was enough of a
target and on his second short skill (MOV) he was observed by a Daysus sniper. The sniper got a free shot and unsurprisingly
knocked the 112 out.
Outraged at such a sneaky ploy, the
infiltrating Grunt just one level down from the Sniper responded with a heavy
flamer and roasted the ALEPH sniper to death.
TURN
2
ALEPH TURN 2
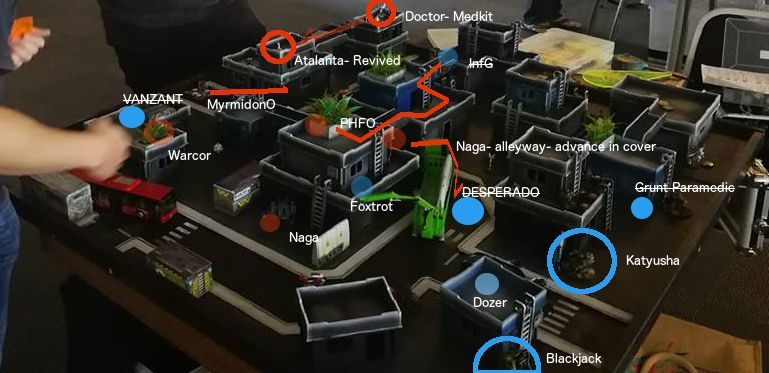
The ALEPH doctor on the far rooftop crawled
her way to the edge before standing up.
From the standing position- she could actually see the prone form of
Atalanta. (I groaned inwardly at the
prospect of having to deal with Atalanta AGAIN). The doctor might flub his rolls though! But no- he successfully landed a medkit dart
on Atalanta who dutifully passed her PH-3 check.
Very annoying.
Atalanta, now on her feet shot Van Zant who
vainly tried to shoot back and killed him outright.
Now having control of the firelanes again,
the PHFO took advantage of Atalanta’s top cover and ran across the rooftops and
took out my Desperado (careful to stay out of chain rifle range). Then the Post Human walked onto the far
gantry to kill last infiltrating Grunt with some SMG rounds to the back.
Finally, the Naga in the middle alleyway hugs
the wall (and the truck!) and moved forward to deny the area in front of Grunt
castle in case I wanted to make a run for the ALEPH HVT.
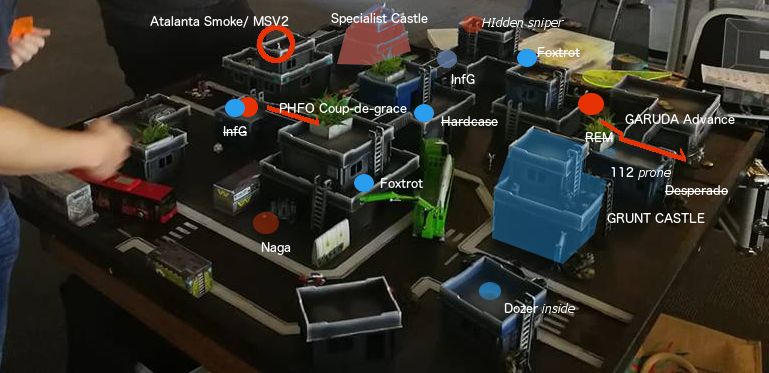
USA TURN 2
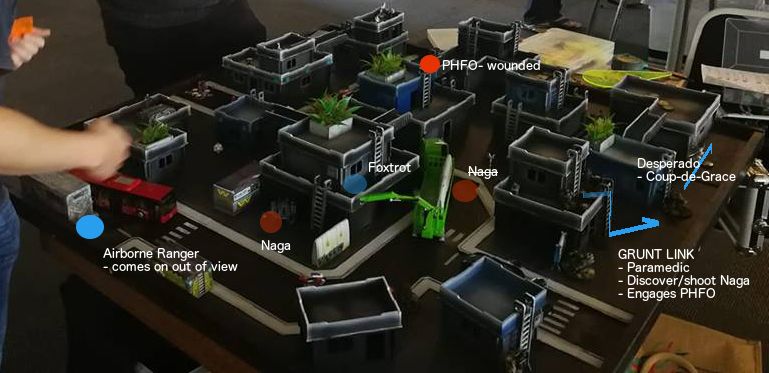
I had to get some points on the board- so
the emphasis was on collecting classifieds now.
I walked my Grunt castle out of its castle
and tried for a long range B5 roll at the Post Human FO. He dodged some, but one landed- putting him
into NWI. He flopped prone.
With that ARO figure out of the way, the Grunts
snuck around and Discovered, then shot the Naga that had wandered close.
Now it was Classified time! The Grunt paramedic revived the Desperado-
getting me my classified! Then my
Desperado rode over the body of the Garuda- bagging me Coup-de-Grace as well!
With all my orders used up, I decided to
walk my Airborne Ranger on the left side (covered from Atalanta and the last
camo marker by the red bus). I wished I
had picked right during deployment- as I think I might’ve been able to cause
some havoc but that’s what you get with AD: Parachutist.
TURN
3
ALEPH Turn 3
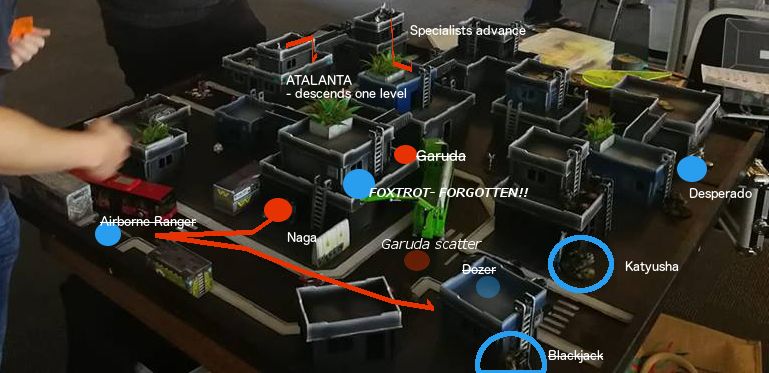
So there is this skill lean out. This takes out a whole order, but it
essentially allows to move your silhouette out to overhang a parapet or wall
and then shoot (i.e. lean out and shoot).
(Note your silhouette is NOT standing out 90 degrees to the parapet
giving you a huge long silhouette to use to draw angles of fire).
So Atalanta then utilized a lean out skill
and took out my paramedic grunt (who thought he was safe behind some buildings). These gotcha moments really suck.
Then using another lean out skill on the
other side- took out the HMG Grunt.
Then with a Danavas assisted landing-
Garuda attempted to land in front of the building with my Dozer in it. Luckily for me, he rolled a 19 and scattered
into view in front of my Grunts and was killed.
The ALEPH Doctor climbed down out of its
tower to cover the Aleph HVT from any final high jinks I might pull.
With defence sorted out ALEPH then went on
a hell for leather run to eliminate my final specialist….
The remaining Naga on the left side of the
board moved into view of my Airborne Ranger and surprise shot him in the
face. Then the Naga raced 4 orders in the
open- surviving AROs from the Blackjack three times (including the DEP), the Katyusha
3 times and then was able to see the Dozer at close range and killed him
through the open door.
My only consolation was that with the final
order, the Katyusha was able to nail that bugger with a rocket.
What really made the icing on the cake was
when we were collecting orders at the end of the game and my opponent reminded
me that my Foxtrot FO could have shot the Naga a few times too (but I had
completely forgotten about him because he was a bloody paper marker!!!!) That was 3 missed AROs from Foxtrot FO!
It might have won me the game- allowing
Dozer to survive (under the flash pulse from the warcor)- dash forward to
sabotage objective or to get to a REM .
USA Turn 3
Being totally mad at myself for giving the
game away, I ramboed my revived Desperado up the board and double critted Atalanta
to death. I tried to claim a few more
scalps but was flash pulsed successfully…. And that was that.
Frikkin paper tiles!!!! Never Again!
DRAW
KEY
LESSONS
FIX
-
Replace Flat camo markers with
Warsenal markers (3D Visible)
o forgetting about the Foxtrot is unforgivable- missing 3 extra AROs to put
down the Naga.
Sustain
-
Deployment selection
o The highest terrain looking into FR zone was on FR half of table
o Prevents infiltrators starting with as many good fields of fire
-
Terrain denial
o Infiltrating Grunt
§ Terrain denial on remaining critical elevation points
§ Daysus sniper-immediate reveal = attacked.
o Hardcase/ Foxtrots
§ “360” ARO on landing areas not immediately covered to the front
Improve
-
Cam marker area defense should
be in complete cover from the FLET (looking back)
o Excellent denial of landing zones
o Need protection from smoke-MSV2 discover and then shoot
-
Specialist protection in HC
o Castle well protected with piquets
o Dozer should have been prone on roof- only takes 1 full order to
climb down.
-
Better use of VZ- once ARO
pieces gone?
o ? Maybe should have gone after Myrmidon officer- ODD plus cover -9…
worth the chance (VZ effectively two wounds).???
o DICE CALCULATOR
§ If the Officer
·
DODGES: 32% of W
·
Nanopulses: 54.8% W
·
COMBI: 35% W (Chance of VZ
Wounded 18.65%)
·
Smokes: 44.63% W
§ Reviewing the numbers- probably should have tried harder killing the
LT.
o Suppressive covering the heights… did not expect Doctor medikit
-
Expect LEAN OUT tactic-
reinforce the requirement to hide completely in reactive with valuable units
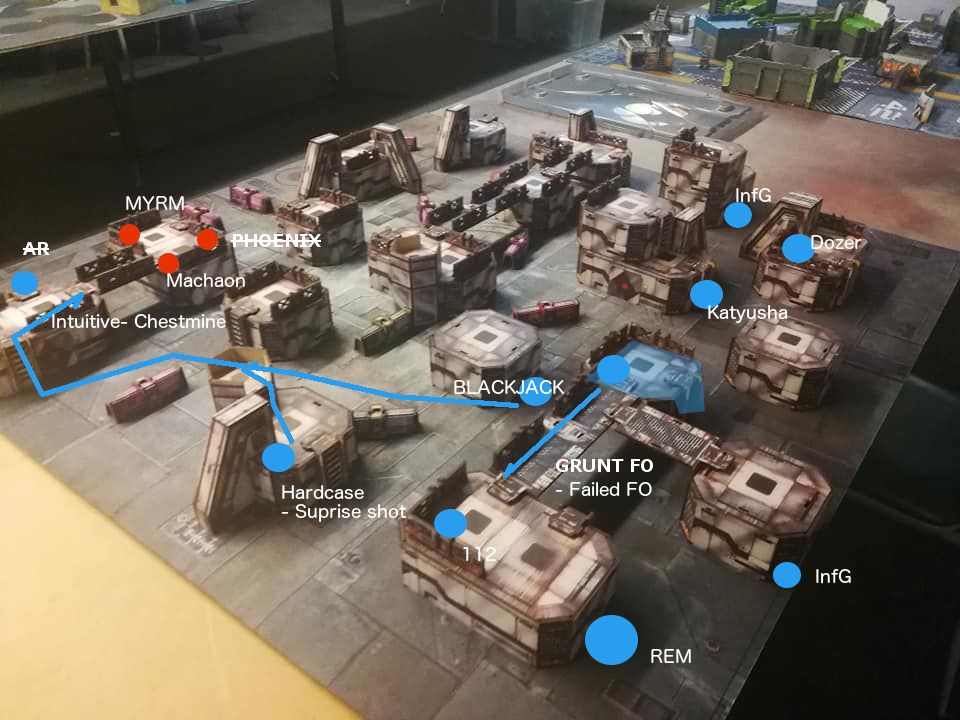
GAME 5- FIREFIGHT- EN: Steel Phalanx
This mission is special in that it has 16”
deployment zones and aerial deployment has no restrictions in the EN deployment
zone.
LIST
Entomarchos: Machaon- Phoenix- 2x Myrmidons
Entomarchos: Thrasymedes- 3x Thorakiti
Scylla plus her two bots
3 netrods
2 Repeater/ flash pulse bots
Atalanta
TR Remote
Win LT- elect to go first hoping to alpha
strike.
I am forced to deploy first.
DEPLOYMENT
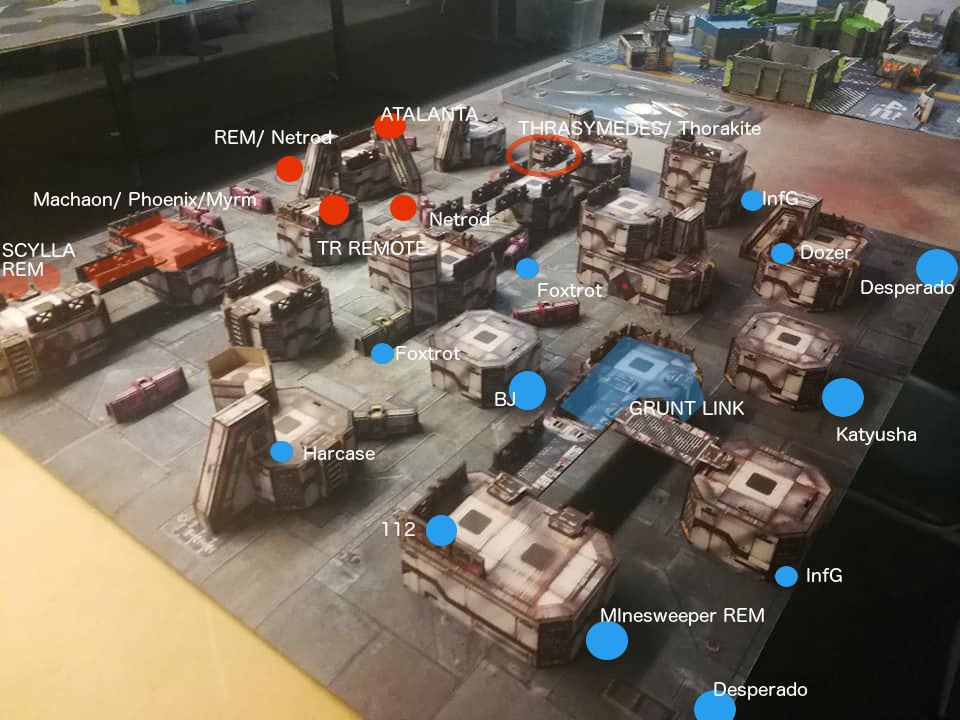
I tried to put my infiltrating Grunts to
overwatch the most likely structure to be the SP castle but both failed their
rolls.
With that disappointing result, I put my
skirmishers in the midfield almost on the midline- taking cover around some
barricades and my hardcase protecting my left flank approach.
My Grunt castle I set up on the most
defensible structure- prone and out of view.
My Desperadoes were set up on the extreme wings and my specialists I
scattered in the most defensible and hidden positions possible.
ALEPH castled up well- Machaon and Phoenix
and their two bodyguards took up position on the buildings opposite my Grunt
link and Thrasymedes and his Thorakites were positioned on the other ALEPH
flank.
A TR remote watched the battlefield from a
building in the centre of their line and Atalanta supported it being prone on
top of a support pylon (the highest point in the ALEPH deployment zone.
Scylla and her two repeater bots hid behind
the Machaon-Phoenix castle and two remotes and some netrods finished off the SP
deployment.
Data-trackers were my Blackjack and SP Thrasymedes.
TURN
1
USA TURN 1
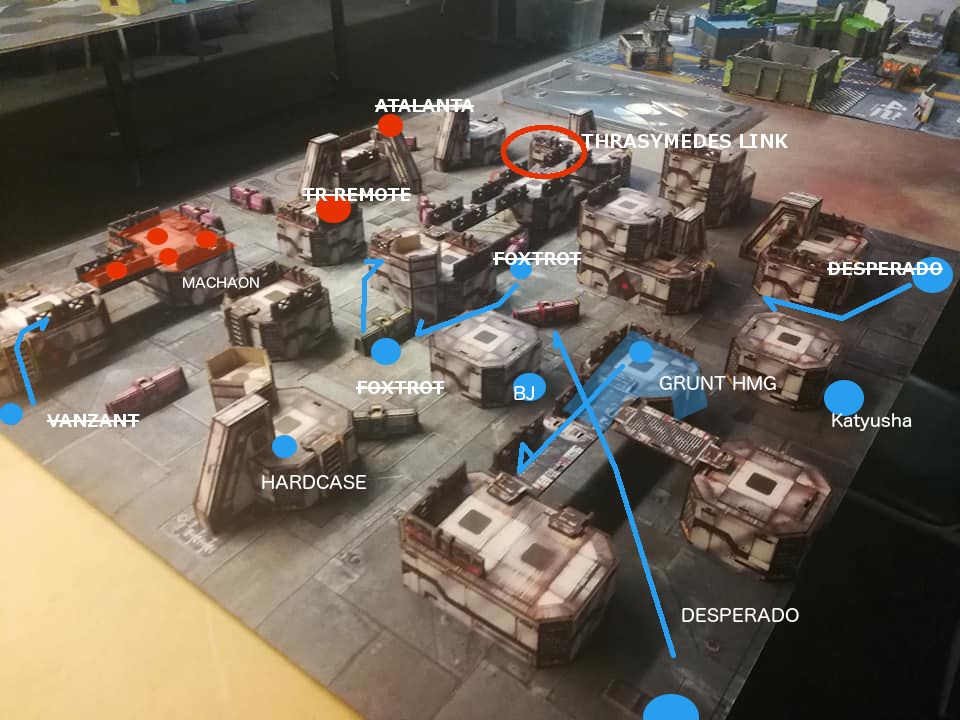
Priority targets were the TR remote and
Atalanta. After my last game, I wasn’t
game to let that model run amok.
It got off to a poor start with my right
most Desperado killed by Atalanta as he zoomed up the field. The usual smoke tactic is useless as she has
MSV2, which lessens their survivability considerably. The other Desperado safely made his way up to
the midfield- shielded by the midfield structures.
My first Foxtrot surprise shot the TR bot
in his good range band. The bot needed
2s to hit and promptly crit. A bit
annoying- but my Foxtrot luckily critted back in response.
I walked my other Foxtrot around to draw a
bead on the REM in another surprise shot and then got critted on 2s AGAIN!
That’s some non statistical rolls right
there!
Unable to play it safe anymore- the first
Foxtrot sprayed with his rifle and this time took the TR remote out of action.
Now the remote was down, I stood up my Grunt
HMG to engage Atalanta prone on her perch.
5B on 14s vs her 1 on 17s was worth the risk I figured. The Grunt won the face to face luckily and
knocked Atalanta unconscious.
Now it came to a decision point- seeing all
the clustered Thorakites and Thrasymedes on my right flank- I maneuvered a
Foxtrot around to try and FO Thrasymedes.
It was a bad choice- and crunching the numbers as we rolled it became
very clear. 2B FO on 7s (WIP 13 -6 for
ODD) when Thrasymedes was rolling 2B on 12s or so meant the Foxtrot was killed
for his troubles.
With that disappointment, I hoped VanZant
would give me some joy. If I could
assassinate Machaon, it would really put ALEPH on the back foot. VZ walked on, climbed up a ladder and tried
to engage Machaon- who shot back whilst VZ was out of cover (hitting on 2B
16s!!!) and killed him. I was finding
out how badly ODD impedes even simple tasks!
Exasperated by how the turn was going I
walked my Grunt HMG to where he could see Machaon and sprayed. Machaon dodged most of the rounds but one
burst hit and wounded the doctor- putting him into NWI. I kicked myself.
Lesson: MOST DICE and THE LEAST RISK- HMG
5x 8 is better than 3x 9 (VZ) especially when Machaon is smoking on 2x 16 or
combi 2x 16 (at least to VZ). I really
should have just HMG’d from the very beginning!
What a waste of a turn’s worth of orders.
STEEL PHALANX Turn 1
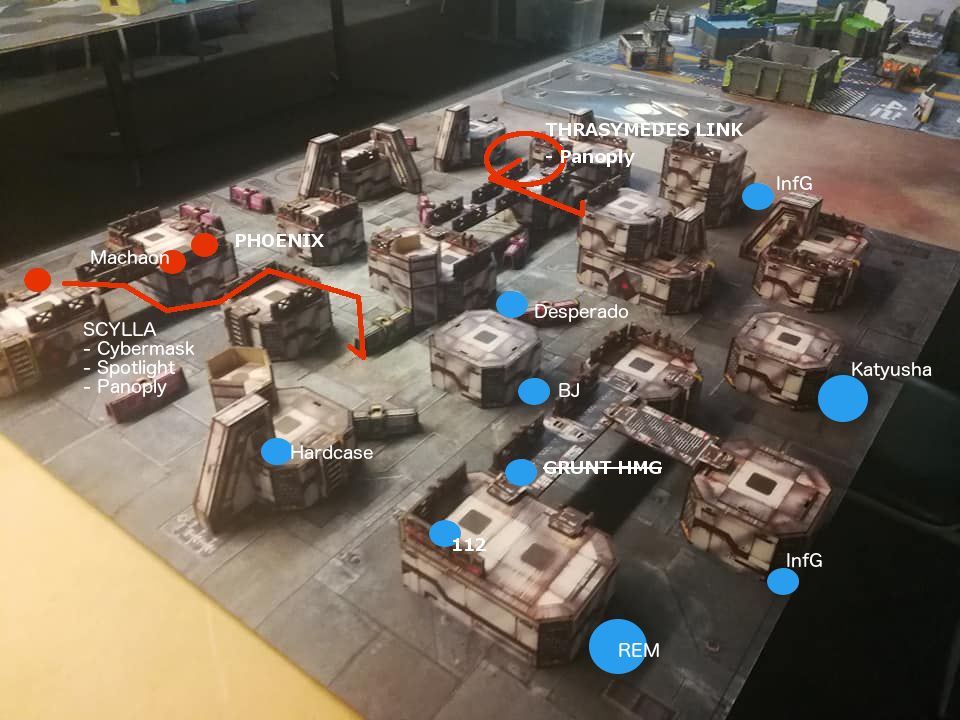
With the first SP order, Machaon
successfully healed himself. I had hoped
that he would accidentally cap himself (and subsequently fail the cube
re-rolls) but it would seem I wasn’t going to get any lucky breaks this game!
Now Scylla cast Cybermask on herself and
started advancing. She snaked her way
around some buildings (losing a bot in the process to Grunt HMG overwatch fire)
and walked her remaining bot to within 8” of my HVT. She then hacked my HVT 3 times- (failing one
roll) and bagged a Steel Phalanx classified.
The only upshot of that was the bot revealing itself during the hacking
attempts- and allowing my Grunt HMG to knock the sodding thing out.
The Grunt had drawn too much attention to
himself and Phoenix stood up and fired his heavy rocket launcher. The Grunt vainly sprayed his HMG back (but at
-9 modifier… good luck)- and he was knocked unconscious. I did think about getting some unopposed
shots into Machaon, but with his NWI- I didn’t fancy my chances in killing him-
so decided to try and contest Phoenix’s rolls.
With both her bots gone- and the Grunt HMG
out of the picture- Scylla made her way forward to the closest Panoply and
(thankfully) fluffed her roll. She
crawled back into cover behind a barricade.
Finally, Thrasymedes and his gang of
Thorakites moved from their deployment zone up to the panoply on my far
left. Thrasymedes made his roll
successfully and then retreated back to his team in total cover in an alleyway.
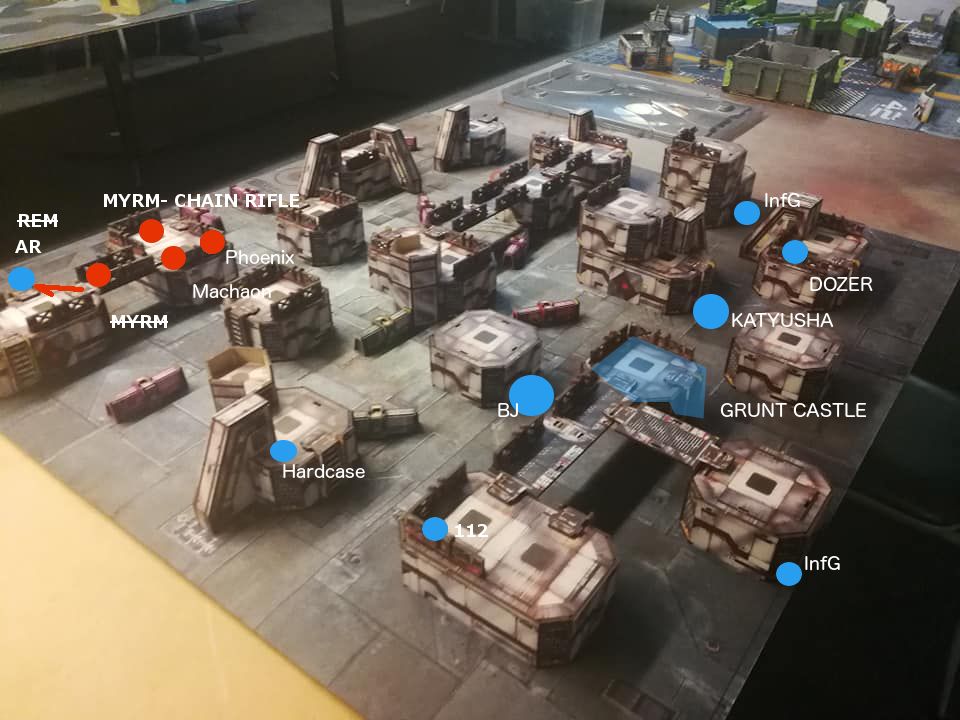
TURN
2
USA Turn 2

Most of my attack pieces were dead and the
ones left over were very vulnerable to ODD (as I had now learned a healthy
appreciation for).
Impetuous orders have to go first though
and my last Desperado sailed out in front of Scylla (and Phoenix). Burst 5 at close range is deadly and the
Desperado cut Scylla down in a hail of fire.
Phoenix- unopposed- put two rockets into the biker for his trouble and
incinerated him. I thought it a
reasonable trade off- despite losing another one of my attack pieces.
Seeing that my Grunt HMG (unconscious)
could draw a line on Machaon and was out of view of Phoenix, I attempted a high
risk revival. The 112 didn’t have the
orders to make it across- so he shot the Grunt HMG with a medkit… only for the
Grunt to fail his PH-3 roll on a 9 and dying instantly.
I needed a lucky break…. So I walked on my
last sneaky attack piece- the Airborne ranger.
He came on behind a bot- who failed his dodge roll- and then engaged it
in close combat and stuck his knife in it for a silent kill. Then slowly making his way up the ladder on
the back side of the building- he was able to isolate Machaon and engaged him
in SMG fire. Machaon survived two orders
worth of attacks and eventually managed to put some smoke on his feet. With not much else to do, the Ranger went on
suppression.
With my second ‘sucker punch’ head hunting
move falling flat on its face with the Airborne Ranger, I decided to try and
deal with Thrasymedes and his band of marauding Thorakites.
My nearby infiltrating Grunt snuck around a
corner to try and heavy flame Thrasymedes (and maybe catch the bunched up
Thorakites behind him). Sadly, the
template only covered Thrasymedes who naturally passed his armour roll and then
flash grenaded the Grunt for his trouble.
Blinded, the Grunt failed his guts and moved back into total cover.
At my wits end- I looked for something that
could strike the blasted link team without having to put up with the -6
modifier to hit (-3 cover and -3 for burnt ODD). It also didn’t help that the Thorakites had
360 visors which precluded the usual shoot from out of sight tactic
either.
Finally I noticed my Katyusha idling on my
back line. I rolled the REM 16” forward to
within 16” of Thrasymedes and his link and started speculative firing on the
link which was bunched in total cover and easily covered by the template.
Speculative fire in good range hits on 7 (BS10
+3 range, then -6 for speculative fire).
I luckily hit on a 6. 2 Thorakite made their rolls and survived but
I knocked out one Thorakite. Thrasymedes
also made his ARM rolls but now the link team was dodging on -3 penalty because
I had broken Entomarchos.
I failed with my next speculative fire roll
but then hit with my next roll.
Thrasmyedes failed his dodge roll and was hit and killed outright. A second Thorakite lost the face to face roll
and was also killed.
With one dazed Thorakite standing amongst
the smoking bodies of his friends, the Dozer stood up from his position of
cover and shot at long range- beating the ALEPH dodge roll and putting the
Thorakite down.
Hoping to continue his run of luck- the
Dozer took a shot at an exposed Netrod- and missed completely.
After a blessed set of rolls for my
speculative fire attack, it seemed that things were returning to normal- drat.
STEEL PHALANX Turn 2
The Airborne Ranger in suppression fire in
the ALEPH backline- by nature of being a specialist- was now target number one
for Steel Phalanx.
The closest Myrmidon broke from the link
team and leapt into close combat. Using
his MA level 3, he gave himself +3 CC and the Ranger -3 CC. The Airborne Ranger used his MA level 2 and
bumped the Myrmidon CC down -3. The Myrmidon
won the first round but failed to wound.
The next round of close combat ended up in an upset- with the Airborne Ranger
winning the fight and knifing the Myrmidon.
Dismayed by the grinning Ariadnan, the final
Myrmidon blasted away with his chain rifle with five orders. The Airborne Ranger seemed to be living a
charmed life- passing 4 dodge rolls and then surviving a double chain rifle hit
on the roll of a 13 and 14!
I know I complained about luck before…
can’t complain now!
TURN
3
USA Turn 3
We were fast running out of time and so I
made a speed play.
My Airborne Ranger noted Phoenix was facing
the wrong way and shot him in the back hitting twice and killing Phoenix with
shock ammunition. The loss of SSL2
seemed to be the key piece for this game!
The last Myrmidon chain rifled the Ranger
in response and finally killed him.
My Hardcase climbed a ladder and tried a
long range shot at the Myrmidon- but at -9 was hitting on 2s and unsurprisingly
missed.
With my Blackjack moved into my main order group-
he walked his way towards Machaon firing his heavy pistol once in range. He missed- unopposed!- when Machaon missed
his smoke throw and I almost howled in frustration. ODD is so annoying!
With the next roll- Machaon unsurprisingly
won the face to face roll and put smoke down on his feet- covering both himself
and the Myrmidon from fire.
I stared in consternation… if only I could knock
out Machaon, I could get some much needed Objective points.
Channeling my inner Norton- I was struck with a genius idea.
With the last gamble, the Blackjack passed
his WIP roll on an 8 to intuitive attack with his chest mine. Machaon dodged on a 4 (and although we
learned later that this was a face to face roll- we played it that Machaon had
successfully made his dodge).
With Machaon beyond my grasp now, my Grunt
FO darted down a gantry way and began Forward Observing the EN HVT- needing
13s. Despite rolling 4 dice over 2
orders, he succeeded only once and failed to get me a classified.
In hindsight, with respect to ORDER
EFFICIENCY- it probably would have been better to bombard castle with the Katyusha-
hitting on 7s and the EN dodging on PH-3.
I had 9 orders- probably 2 to move into position leaving 7 attempts to
attack at no risk. This would have avoided
the whole issue of ODD and Machaon’s PH+3 smoke AROs.
STEEL PHALANX Turn 3
With the Blackjack glowering over Machaon
and the last Myrmidon, the Steel Phalanx player voids last turn to avoid any AROs
and possibly losing Machaon.
Minor win 4-3.
KEY
LESSONS
FIX
-
MOST BURST at LEAST RISK is key
o HMG Grunt Link had 7 orders to hose down Machaon
o Only spent 1 order doing it (and getting a hit).
o Wasting AR/ VZ- who are B3- at close range to Machaon and hampered
by ODD had v. poor likelihood of success
-
Underestimated Entomarchos/ ODD
Combination
o 4 member = SSL2 meaning there
will be opposed FTF rolls even in the rear arc.
ODD meaning always incurring a -3 penalty at best. -6 usually (ODD with no cover). -9 at worst.
o ARO at B2 coupled with those modifiers make success VERY unlikely
-
Blackjack deployment on forward
line
o Risk of Scylla- isolating and taking out my other attack piece
SUSTAIN
-
SPEC FIRE in a situation that
allows freedom of movement
o Thrasymedes- -9 to hit with rifle (-6 ODD)- and then out of cover
rifles >16” distant (extra -3) = hits on 2 or 3. (Horrible)
o Hitting on 7 is better than 2.
o Also 1 dice vs 1 dice (use the swinginess of D20 to your advantage).
o Bunched enemies- forcing 4 rolls means at least one will fail
(usually) providing you hit of course
-
INTUITIVE ATTACKS
o FTF – Blackjack vs Machaon
o The right tactic despite being played wrong.
IMPROVE
-
5 dice (maybe 4 dice) on good
range against ODD in cover is -6 over all.
Worth attempting if at low risk.
o Generally quoted as 4B on -6 is 50:50 for a success (unopposed!)
o 3 dice SMG/ rifle or two dice FO/ pistols are pointless.
-
SPEC FIRE against Entomarchos
(esp when EN wearing ODD) is better than trying guided (intent of AR/ FOs) due
to their inability to win FTF
o FO/ guided is only good when unopposed in these situations
o DICE CACULATOR
§ Machaon/ Phoenix/ Myrmidon (SSL2) only 24.7% W
§ Thorakite (SSL2) 26% W
§ WITHOUT Entomarchos- 30% W
-
VZ should really go for low
hanging easy to kill fruit. Better off
being alive gutting an order pool than wasting orders on poor odds (pistol/
rifle against ODD) FTF rolls.
DISCUSSION- not exclusive
Conceptual
WEST/
EAST (see BOYD PATTERNS OF CONFLICT further on/
Post Cancon notes)
-
WEST- Attrition
o 5B HMG link
o BJ
-
EAST- Maneuver
o Keep camo, camo unless absolutely have to.
§ Preserving combat power
§ Avoid being maneuvered?
·
Keep the camo to keep them
guessing?
o Zheng: BJ, HMG Grunt, Desperado
o Qi: VZ, additional AR
SHOCK
ACTION
-
Achieve surprise- Unexpected
avenues!
o VZ
o Second AR
o FO/ Artillery strike/ Speculative fire
§ Katyusha- better than Uragan? DA vs. AP
§ Orders to pump into it
§ Flip from Guided to Spec or vice versa depending
-
Maneuver with speed and
aggression
o Divide and force attention
§ Desperado/ VZ/ AR
§ Vs. mainline
o Trade size for disproportionate effect- seize quadrant, break link,
open flank (e.g. from one model/ few orders)
o Sustain in the reactive?
§ Still not being able to do it- weakness of USA???
§ ? Naturally weak in ARO
-
Mass force and firepower
o Aim for the COG
§ Good aim in game 5 but bad execution- Machaon better assassinated by
the B5 HMG
§ Very foggy in game 4- bad CMAP
·
My own CV- specialists not well
protected enough.
·
EN ARO pieces- controlling my
active- OODA
MSU
(multiple small unit)
-
good maneuver overall
o able to dictate battle in Games 1, 2, 5
o best maneuver was game 3 by IKARI
§ Game 4… see sawing
OODA
LOOP
-
Boyd
-
Observe- Orientate- Decide- Act
= Setting the “tempo” of the game
o Historical F86 Sabres vs. Mig15s over Korea
-
Get inside the decision cycle
of the EN
o Faster OODA inside the slower OODA of the EN
-
Getting the EN to react to you
and not being able to do their own thing is operating inside their OODA
-
HOW?
o Control the reactive turn directly (very difficult for some factions
like USA). Atalanta game 4- and
sustaining with Doctor- is a good example.
o Stay alive in your reactive- dictating EN effort (frustrating them
anyways)
§ Sphinx vs. Grunts Game 2
§ AR vs. Myrmidon Game 5
·
Got lucky though
o In your active- appropriate combination of ATTRITION and MANEUVER (or maybe even either done very well???) to cripple enemy and force them to act
to what you’ve set up (VZ in suppression in backfield).
BOYD-
PATTERNS OF CONFLICT
-
Essence of Attrition Warfare
o Create/ Exploit/ Magnify- (BJ/ Grunt Link)
§ Destructive force
·
Weaponry of widespread
destruction- B5 HMG
§ Protection
·
Minimize the effect of
destructive force by
o Cover
o Dispersion (spreading out along cover)
o Obscuration (smoke)
§ Mobility
·
Speed to allow focus or to move
away from EN focus of destruction
o Pay off
§ Debilitating attrition
·
Allow seize and hold terrain
·
Break EN will to resist
BOYD-
PATTERNS OF CONFLICT
-
Essence of Maneuver Conflict
o Create/ Exploit/ Magnify- VZ/ AR
§ Ambiguity
§ Novelty
·
Impressions of new experience
(AD:TJ)
·
Different or second AD
·
Intuitive attack through smoke
·
Speculative fire onto packed
units
§ Deception
·
A “weak” area that is actually
for AD to catch overextended advance
o AR/ VZ in Game 3
§ Fast transient Maneuvers
·
Game 1: Desperado. VZ.
AR.
§ Effort
o Pay off
§ Disorientation
·
Mismatch between EN plan/ view
of battle to what is actually eventuating
·
E.g. Jotum advance into
gauntlet… allowing AR to come from behind.
§ Disruption- splintered effort, orders frittered away
§ Overload
·
Psychological “play the player”
Poker idea
o Fire/ Movement used in combination (tie up and divert attention
strength to expose/ exploit/ menace vulnerabilities ELSEWHERE (my emphasis)
BOYD-
PATTERNS OF CONFLICT
-
Counter Blitz
o Defense not thought of as a belt/ front
o Thought of as gauntlets/ avenues
§ Game 3 and 4- camo markers ‘rear’ facing
Tactics
DO
THE MISSION- SCHWERPUNKT- (focus of effort) plus NEBENPUNKTE (supporting/ feint
efforts)
-
Plebian comment
o Every turn- an objective= main effort amongst parallel lines of
operation
-
Game 3 vs Ikari- done well
-
Game 4 vs. ALEPH- done
badly!!!- difficulty dealing with Atalanta/ Garuda diluted orders from actually
getting the classifieds done
-
Annihilation- holding force and
maneuvering force is one example
-
Game 4: Highly classified- should
have done it better- too many orders on VZ (post Atalanta)- should’ve used the
orders on something else… maybe reconfigure the list to have a Desperado in
there or a Hardcase in Group 1 to allow that flexibility in changing focus of
effort once objective achieved.
DEPLOYMENT
-
OCOKA mnemonic
o Castling
o Obstacles to you and them (AR with AD1, Desperado 55mm base)
o Key terrain
§ Keeping the tallest buildings on your side- and then contest the other
dangerous heights (InfG, Hardcases, Foxtrots)
§ Most afraid of scenario: Daysus sniper with NWI overlooking my
entire deployment zone
o Avenues of approach
§ Done poorly with most games (my ARO’s got shot down)
·
Gav’s comment- don’t contest
reactive
·
Lachlan Summer- do contest
reactive with deadly ARO- problem no Riot Grrl equivalent, no ODD, SSL2 with
current Grunt configuration not optimal
·
Jordan’s comment: not SSL2, not
HD, not ODD… it’s going to die…
·
Answer probably somewhere in
the middle depending on faction and context… TURN 1 USA- think Gav, not
Lachlan.
§ Done well with Game 1
·
Recognizing which side had best
protected access to the supply crates
§ Most proud of game 4
·
Recognizing and blocking
landing zones
·
Gauntlet defense
EN
ANALYSIS- IDEAS
-
Problem, you don’t get to
appraise the EN until contact
o unless regular play within the meta
-
Often you won’t have a lot of
experience and it can be very difficult to determine
o First time you run across something, you’re probably going to lose
§ Very nervous dealing with Ikari (Smoke/ MSV2/ speed of attack/ avenues
of attack)- in hindsight very much a maneuver army vs. attritional
o MLCOA (most likely course of action)
§ Ikari company… no idea what their method of attack was
§ No idea about how effective Yojimbo could be
o MDCOA (most dangerous course of action)
§ smoke/ MSV2
-
COG
o Varies between missions- not always the Clausewitzian- “biggest
attack piece”
o Lucky that most of the missions in this tournament were very killy
and the COG usually was the biggest threat
-
CC
o Experience determined
-
CV
o Experience determined
-
MLCOA/ MDCOA
o Familiarity with EN list
No comments:
Post a Comment