
 |
| Credit: Jason Heuser |
BLUF: 4th out of 16- sabotaged myself by not
reading mission scoring. One minor victory should have been a major
and one minor victory WAS a major but not recorded as such (read how the
bloody missions score before submitting forms!!) and my one loss could have
been mitigated.
My poor mission
comprehension cost myself a podium spot.
Never again!
Lists
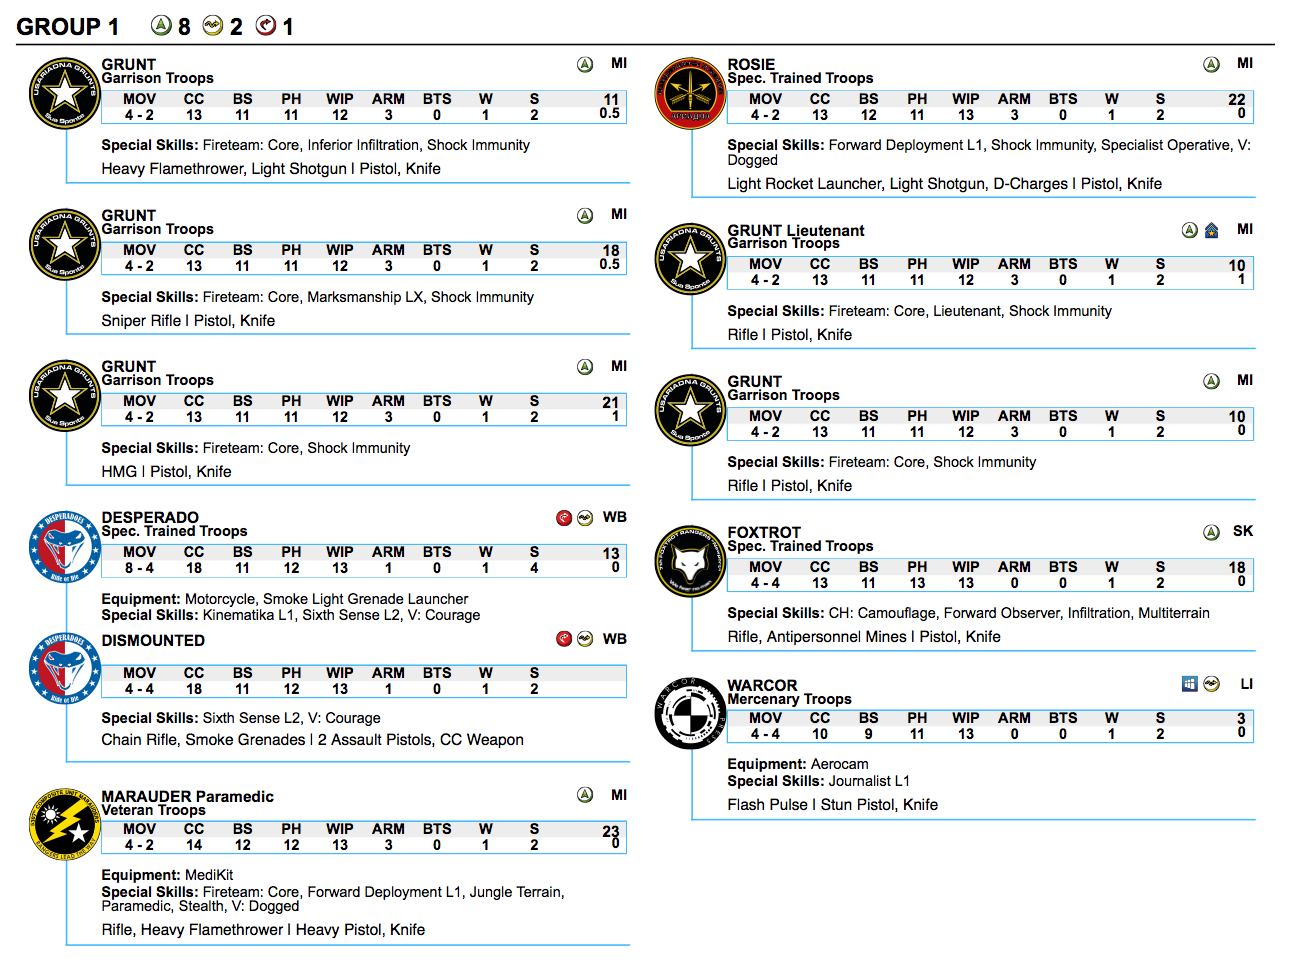
Bateman 300 ITS10- Primary List
Group 1

Group 2
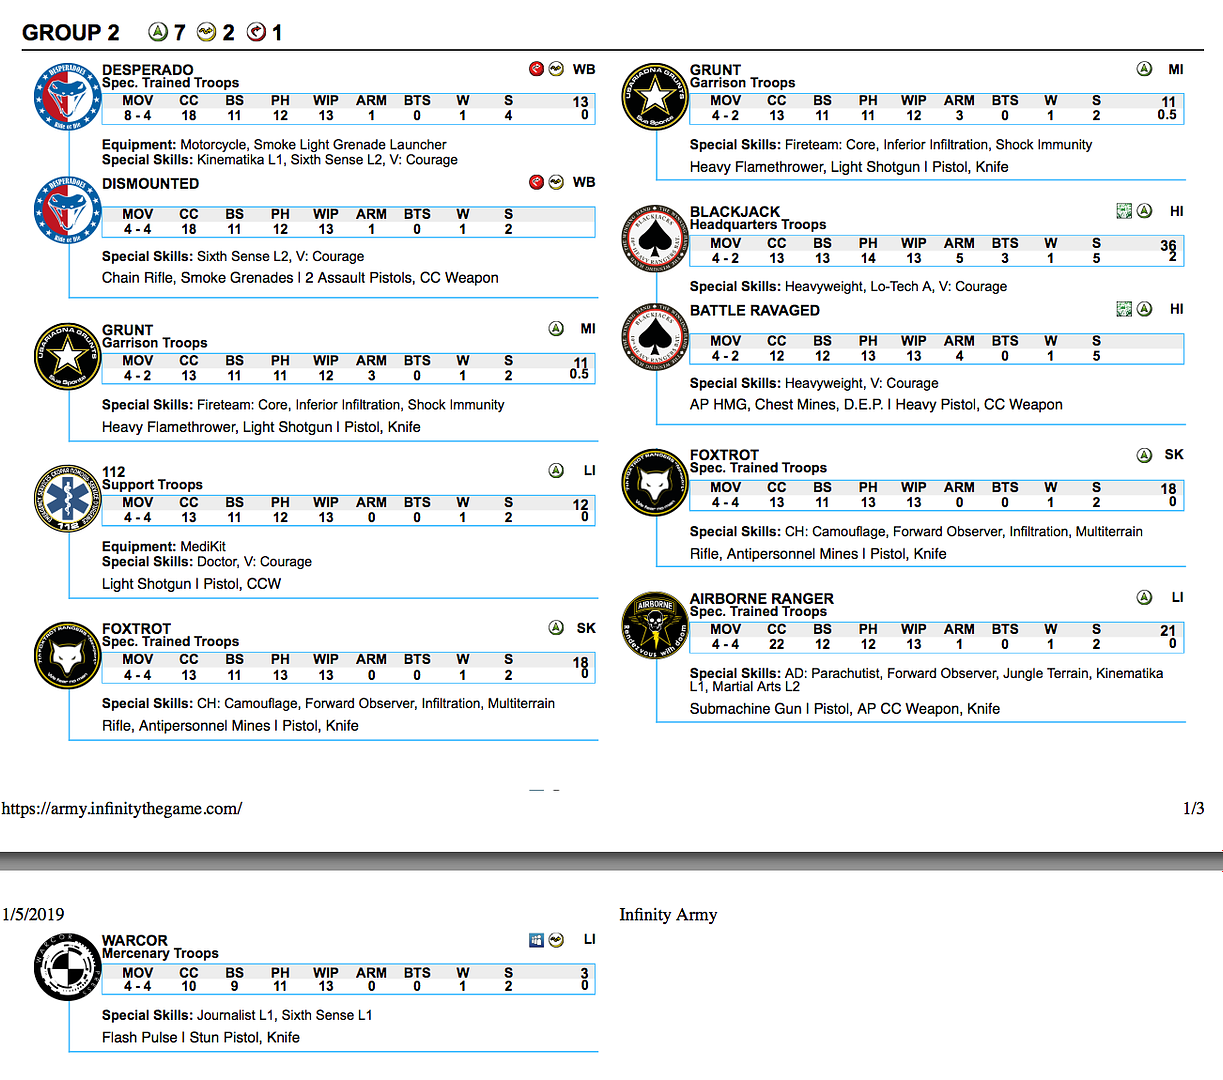 |
| Warcor to round out the points. |
Comments:
-
Try to
accommodate Rosie and exploit her FDL2.
Loot & Sabotage Biotechnovore List
Group 1
Group 2

Comments:
-
Forward
Deploy for ‘soft defence’ speed bumps in Marauders
-
Impetuous
orders for quick escape from BTV zone
-
Maverick
FO- for L&S vs. UR. Speed to access
panoply and draw D-charges
-
Weighted
towards ARO- protection of the AC2 and going second in BTV.
Mission 1- L&S: EN-
Vanilla Ariadna
Mission Synopsis
-
Protect
own AC2 (3 STR each 1 OP)
-
Damage
EN AC2 (3 STR each 1 OP)
-
Destroy
EN AC2 (2OP)
-
Acquire
more loot from panoply (1OP)
-
Classified
x1
EN- List
Line Kazak- LT
Line Kazak
Line Kazak- HMG
Spetznaz HMG
Dog Warrior
Uxia McNeill
Scout Minelayer
with Emauler
Foxtrot Sniper
Wardriver
Chasseur
Tank Hunter CoC
Veteran Kazak
Paramedic
Metro- Inferior
infiltration with D-Charges
FR- List
L&S_BTV List
I won the
Lieutenant roll off and picked deployment side- making my opponent deploy
first.
My opponent picked
turn order and elected to go first.
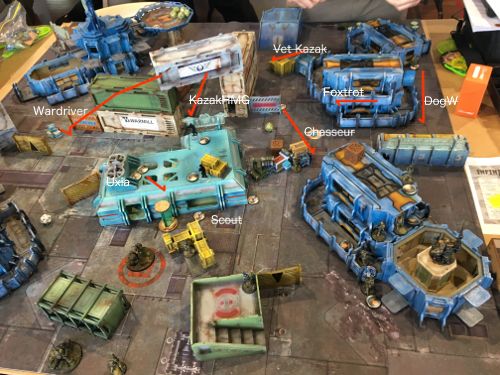
Deployment
 |
| FR blue. EN red. |
I picked
deployment side because I wanted to the side with the most protected AC2
(blue)- as you will see.
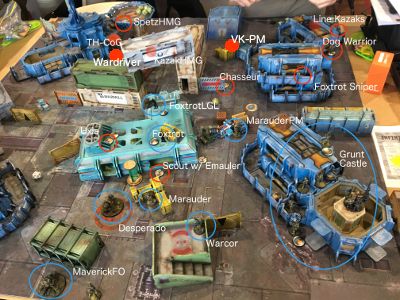 |
| Deployment sorted out. |
The Ariadnas
deployed quite aggressively, both Uxia and the Scout making their infiltration
rolls- Uxia on the roof top and the Scout practically next to the AC2.
The remainder of
the Ariadnan force took up covered positions over looking their own AC2.
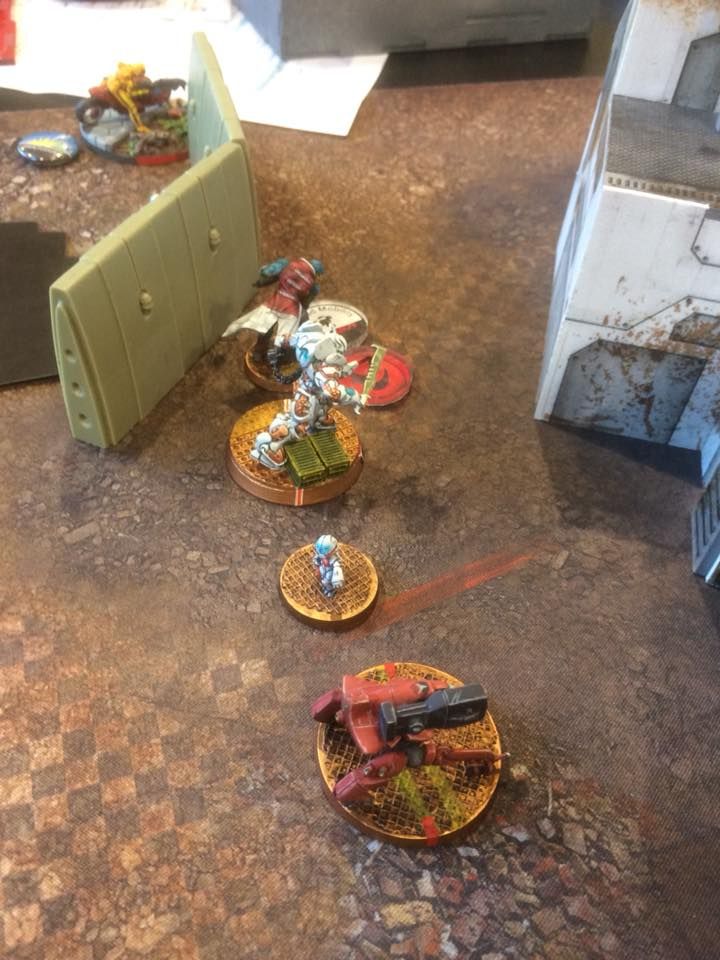
 |
| Dog warrior awaiting transformation! |
A lone Dog Warrior
was positioned for a run up the flank.
My deployment was
a straight up counter deployment.
Recognizing Uxia as the probable threat, I picqueted her with my own
Foxtrots. A Desperado with SSL2 stared
straight onto the roof edge and also on the other camo markers near the AC2. I waived one of my Marauder’s FDL2 and put
him square in front of the AC2 hefting his heavy flamer threateningly.
My Grunt castle
overlooked the AC2 with exception to the sniper who looked towards the Dog
Warrior. My Blackjack T2 sniper also
looked down that same alley. After a
better look- I realized I could see a Line Kazak too… and I guessed it was
probably their Lieutenant.
GAME SUMMARY
Turn 1
Turn 1- Vanilla
Ariadna
 |
| ARO city. |
Things went badly
for the Ariadnans from the first order.
The Dog Warrior
ran forward attempting to throw smoke only to lose the face to face to the
Grunt Sniper and the Blackjack. Taking a
wound from the sniper, he transformed- but much to the surprise of my opponent-
T2 blew through the Dog Warrior’s total immunity and knocked him unconscious.
Uxia crept to the
edge of the building and attempted to smoke the AC2 only to have the HMG and
Rosie from the Grunt castle engage her and take her out. One of the Foxtrots also revealed but missed
with his pistol, as did the Desperado.
The Scout engaged
the Desperado who fired back with his assault pistols valiantly but was taken
out. Moving forward though, the Scout had
exposed himself to the Marauder standing amongst the crates who gleefully
flamed him to death. A storm of fire
from the Grunt castle also slammed into the twitching body. In a chain reaction- the E-mauler went off-
isolating the Marauder who glumly spent the rest of the game looking at the
smoking corpse of the Scout.
The threat of the
Grunt castle was making itself apparent and the line Kazak HMG advanced,
gunning down the forward deployed Marauder paramedic. Pushing his luck, (with no cover) he engaged
the Grunt HMG who luckily blew him off the table.
The Veteran Kazak
engaged the Grunt Sniper at long range.
Despite losing a face to face and taking a wound, he persisted and the
Grunt killed him after several rounds of fire.
The Wardriver
advanced around a flank and the Chasseur on the opposite flank did the
same. The Chasseur tried to access the
panoply but unluckily failed his roll.
With not a lot of
choices left, the Foxtrot sniper surprise shot my own revealed Foxtrot on the
rooftop close to my AC2 but who dodged successfully. Luck really wasn’t with the Ariadnans today
and not only did he lose the face to face roll, the overwatching Grunt sniper
put the Foxtrot sniper down.
Turn 1- USA
The luck of the
dice was ridiculous- I’ve never had a reactive turn that good.
Roaring forward
and throwing smoke, my Maverick and remaining Desperado moved up towards the
enemy Wardriver taking up position around the central cargo containers. The Desperado charged out of the smoke with
double assault pistols blazing and killed the Wardriver who had missed with his
shotgun!
Having done the
hard work- he threw out another smoke grenade- blocking the line of fire from
the camouflage marker (Spetz HMG) covering from the landing pad looking through
the gap between the central containers.
With the Wardriver
out of the equation- my Maverick made it to the left most panoply and drew some
D-Charges. Running through the smoke
laid down by the Desperado, he rode around the side of the containers to shield
himself from the landing pad.
I advanced my
Grunt link slightly forward- engaging the nearby Chasseur and cutting him down
with B5 HMG fire. The whole climbing
down and moving was quite order intensive and as it was, the Grunt link team
made it the edge of their building and took up position to overwatch the
camouflage marker on the landing pad for next turn.
My Blackjack
jumped across to his right and discovered a good line of fire onto a line Kazak
facing the wrong way and standing up. Unopposed
T2 sniper fire killed him outright.
I had just killed
their Lieutenant.
TURN2/3
After such a
strong Turn 1, there wasn’t much the Ariadnans could do. The Chain of Command kicked in though and the
Spetz HMG moved across the landing pad and engaged the Grunt link several times.
Forced to split
burst in the face of overwatching Grunt HMG and Grunt sniper fire- the Spetz
eventually lost both his face to face rolls and was killed.
Now with the Spetz
down, my Desperado laid down smoke over the approaches to the AC2- allowing the
Maverick to ride in and close combat- laying down D-charges. The first lot of D-charges knocked two STR
off the thing, and the second lot of D-Charges finished it off.
With the AC2
knocked out- my Desperado raced around the smoke to engage the Tankhunter and
was shot down. My Maverick fared better-
MSV1 helps!- and killed the Tankhunter.
Flushed with the
success of the AC2s destruction, the Maverick rode towards the remaining Kazak
only to wear a rifle burst from the Line Kazak in the chest and be knocked
unconscious.
To finish the game
off, one my Foxtrots made his way over to the last Kazak (who was facing the
wrong way) and shot him in the back.
Result- Major Victory
DEBRIEF- KEY LESSONS
First off- my dice
were rolling hot. I had a series of
ridiculously good face to face so this win was very much due to that.
Fix
Speed of Deployment
-
Ideal
is 15min
-
need
to organize my trays better- had a lot of superfluous figures!
o ?one tray one list
-
need
to practice with my lists so I actually don’t have to search around and think
about it
Remembering HVT
-
see
above
Remembering Classifieds
-
I was
a bit caught up with the pre-game nerves
-
Always
take the time to re-read and annotate the mission brief- highlight like how Rob
does
Sustain
Soft Defense/ Castle Defense
-
mission
dependent
-
camo
markers 360 defense against infiltrators
-
multiple
AROs protecting AC2
-
Lucky
use of T2 to kill off the Dog Warrior!
o The Dog warrior smoke and quick move would
have been able to obscure the castle
Smoke/ Move
-
smoke
to obscure movement
-
allowing
for unopposed attacks on the AC2
Improve
Dog Warrior/ Counter Smoke
-
in
hindsight it is clear how important the Dog Warrior was to game
-
the
castle is well countered by smoke throwing
o future- ?triple ARO threat to Dog Warriors?
o Reliance on gauntlets that the EN must run
through or expend orders negotiating
§ Foxtrots
§ Marauders FDL2
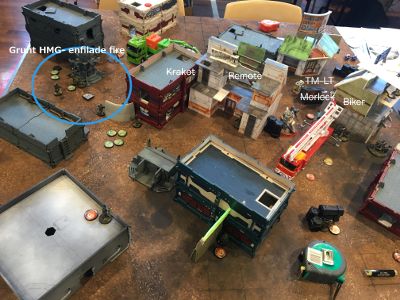
Mission 2- Biotechnovore:
EN NOMADS
Mission Synopsis
-
8”
deployment
o end of each players turn- hit with BTV
virus
-
Classifieds
x 3
-
Do
more classifieds (1 OPs)
-
Kill
more army points than adversary (2 OPs)
-
OP for
surviving models graded by
o 75-150 (2 OPs)
o 151-250 (3 OPs)
o 251+ (4 OPs)
EN List- Limited Insertion
-
Taskmaster
(LT)
-
Taskmaster
ML
-
Lizard
HMG/ HGL
-
Krakot
-
Morlock
-
Puppeteer
with Counter-Intelligence
-
Remote
-
Remote
with combi rifle
-
Remote
with combi rifle
-
Zondnautica
Nomads won the Lt.
order and elected to go first. I picked
deployment side and made the Nomads deploy first.
My 3 Classifieds:
Casevac
Experimental Drug
FO EN.
FR List
-
L&S_BTV
List
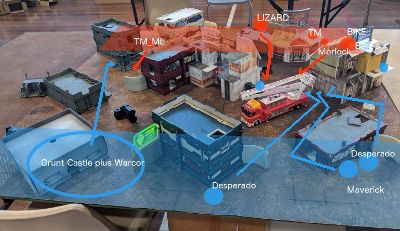
Deployment

Nomad
Deployment
The Nomads grouped
around their left flank- the Morlock getting 8-4 move on metachemistry and
planning on using smoke to cover the advance of the Taskmaster and Zondnautica.
The Lizard with
its climbing plus camped out behind the central building with the Puppeteer and
Krakot.
The Taskmaster ML
sat on the starting line on the Nomad right.
USA Deployment
I tried a few
silhouettes trying to get a few good ARO positions. But as it was with the short deployment zones
and the tall central buildings I couldn’t get good eyes onto the Nomad starting
line.
I knew I wanted to
be away from the Lizard and I was particularly wary of the Taskmaster ML
template.
With that in mind-
I set up my Grunt castle on my left- with the Warcor and Grunt Sniper on the
roof facing down the Taskmaster ML. A
HMG looked around the corner at street level and the rest of the team was
spread out- wary of the templates. The
Forward Deploy special skill for ITS X wasn’t that helpful for the link team as
I didn’t want to risk having my link team too spread out and out of coherency.
I put my bikes in
full cover- hoping to keep the alive to utilize their impetuous orders to get
out of the zone.
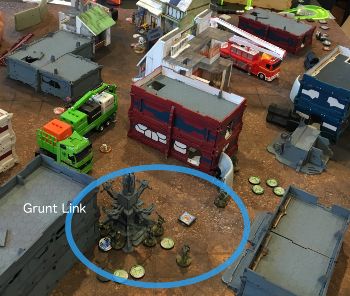
Unsurprisingly, my
inferior infiltrating Grunts all failed their rolls but two of my Foxtrots
managed to stick their landings. Both Foxtrots
who made their rolls were looking down at the Nomad left flank- spying the
Zondnautica. Hopefully I would remember
to drop mines this time!
GAME SUMMARY
Turn 1- Nomads
The Nomads started
by smoking up their right flank with the Morlock. One of my Foxtrots revealed and snapped off a
shot but rolled a big miss. So much for
that ARO!
The Krakot raced
out of the zone unopposed and hid in total cover by the central building.
With the smoke
down, the Morlock ran forward with his 8-4 move and tanked a shot from the
other Foxtrot by the central building.
He chain rifled the Foxtrot who luckily shrugged it off.
One of the remotes
ducked around a corner with its combi rifle and the same Foxtrot gamely shot it
down.
This Foxtrot was
proving to be an issue and the Lizard vaulted onto the roof of his building to
get line of sight. He blasted the
Foxtrot with multi-HMG and reduced him to pink mist.
The Lizard
advanced out of the Biotechnovore zone, losing a face to face with an
overwatching BJ-T2 sniper I had placed on my right flank- but luckily passed
his ARM roll.
The Taskmaster ML
found himself in a trickier spot. Out in
the open, he wore the AROs from the Warcor and linked Grunt sniper- taking a
wound in his first move despite shooting back.
He tried moving again and shooting- but again lost the face to face with
the Grunt sniper and went down.
Putting a few
coordinated orders down, the remainder of the Nomads advanced out of the
zone.
The Lizard, getting
into position close to the fire engine- lobbed a speculative HGL shot amongst
the link team that luckily failed to land.
Now safe, the
Nomads started locking down the approaches.
The Lizard, the Zondnautica and Taskmaster LT went into suppression.
As the turn ended-
the Biotechnovore virus claimed the Puppeteer who was just inside the zone and
with that it was down to me.
Turn 1- USA
Impetuous orders
go first and I staggered my bikes so they were able to smoke the approaches on
either side of the fire engine and the suppressive fire Lizard.
With that sorted-
one of my bikes raced around the rear of the Lizard and blazed away with his
double assault pistols. Sadly he missed
with most of his shots (on 14s… come on!) and the rest bounced off.
Disappointed with
his attack- the Desperado continued to make his way around the corner of the
fire truck and chain rifled the Morlock and Zondnautica- taking out the
‘rider’. The Morlock tanked his save and
chain rifled back, blowing the Desperado away.
With my bikers out
of trouble, I marched my Grunts out of their castle and up the left flank. And then walking up the side- they noticed
they had quite a view down the entire Nomad line.
Burning orders- my
Grunt HMG got in position behind the broken communication tower and started
blazing away. It was carnage as the
fully linked HMG cut down every model in sight, in short order. Even the Taskmaster Lieutenant crumpled under
the fire.
With the last few
orders in my second order pool I charged my Blackjack up the table out of the
zone. A coordinated order got my
Marauder paramedic and Foxtrot LGL out as well.
With my turn done,
the Biotechnovore virus predictably slew everything left in my deployment zone
save for the 112 who miraculously made his BTS save.
Turn 2- Nomads
With only the
Lizard left standing, it lobbed another HGL shot at the Grunt link team and
scored a hit.
Four of the Grunts
were hit (including my Lieutenant! Gulp!) and two of them went down. The Lieutenant and HMG luckily survived.
The Lizard went on
suppression, daring the circling USAriadnans to engage.
Turn 2- USA
I moved my
Blackjack into my main group and managed to skirt him around the building to
try and get a rear shot on the Lizard.
But a combination but 4-2 is slow pace and I still ended up shy of where
I needed to get a line of fire.
My last Desperado
sailed into the Lizard with double assault pistols blazing- and hit once- only
to have the TAG punch him to death.
I grunted in
disgust at these 5 dice shenanigans- Ridiculous!
Surviving the
virus, the 112 made his way over to a fallen Marauder and revived him, netting
me a classified.
The Maverick FO-
raced up to the Lizard and won the face to face and successfully forward
observed it- netting me my second classified.
Turn 3
The Lizard burned
its orders attempting another Spec-Fire but failed.
With that- I
looked at my final Classified- Cas-Evac.
Didn’t I have to be veteran or elite trooper to do those rescue type
moves? I looked at the Grunts- no
veterans or elites here. I looked at my
opponent who was despondently packing up his unconscious miniatures.
I called the game
at that point….
**face palm**
RESULT- Minor Victory.
I looked up the wiki afterwards- Cas-Evac is any
trooper with PH the same or greater than the unconscious model. And being in the opponents half of the table-
my Grunt link with it’s unconscious members would have netted me a further 1
Objective Point. It could have been a
major… if only I had read up!!! I kick
myself!!!
The legacy of old ITS seasons would rear it’s ugly
head yet again… in a far more ugly fashion….
DEBRIEF
FIX
-
Know the classified deck for goodness sake!
o
I have
a bad habit of assuming things and running with it
o
Looking
up the wiki would have taken a minute at most and it ultimately cost me a
podium spot!
SUSTAIN
-
Good use of silhouettes
-
Soft defense
o
Using
the Foxtrots to waste the EN order pool having to smoke and advance
-
Castle counter-deploy
o
Grunt
sniper was probably MVP of this match
o
Without
the range- my castle would have eaten those ML rounds
IMPROVE
-
Anti-ARM
o
I
became painfully aware that the army had very little anti-ARM
o
The
BJ-T2 sniper only has an SMG.
o
I
could have 5 diced the Lizard with the Grunt- but I was far too out of position
(4-2 MOV with much reduced order pool).
o
In
this engagement- I should have walked the Blackjack into short range with his
SMG and cover and gone toe to toe with the Lizard in suppressive. It had the best odds of hurting it
(especially since the Grunt HMG was so far out of position).
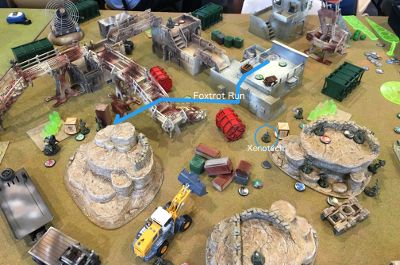
Mission 3- Supremacy: EN
MRRF
Mission Synopsis
-
Hack a
Console (up to 3) (1 OP each)
-
Dominate
more quadrants at the end of EACH round (1 OP)
o
Xenotech
in a Dominated Quadrant at the end of each game round (1 OP)
-
Place
the multiscanner (1 OP)
-
Classified
x1
EN: List
Metro Lieutenant
Briscard x5 Linked-
Sniper, HRL, paramedic + 2
Chasseur mine
layer x2
Chasseur FO x2
Dozer
REM: Urugan
REM: Minesweeper
Paracommando-
Rifle FO
Metro- inferior
infiltration x4
FR: List
Bateman_300_ITS10
I won the Lt roll
and picked the side with the most covered consoles and made MRRF deploy
first. The MRRF elected to go first.
DEPLOYMENT

MRRF Deployment
The French
deployment started with a flurry of inferior infiltration rolls- that all
failed thank goodness!
4 Metros with
inferior infiltration ended up being deployment zone guards- well spread out
and protected by terrain- and conveniently stopping any sort of VZ from behind
shenanigans.
The Briscard link
took up position spread amongst the buildings/ walkways and the tractor,
utilizing their FDL1 skill to make the best of the terrain.
The Urugan (total
reaction AP-DA), Minesweeper remote and Dozer hid out in the most protected
corner of the field with the Xenotech close by.
Finally, a grand
total of 6 camouflage markers held a skirmish line in the midfield. Trying to pick which would be mines and which
weren’t would be very tricky!
USA Deployment
I started with my
inferior infiltrating Grunts- one failed but one succeeded- landing prone
amongst the Briscard link on the building.
Hefting his heavy flamer with a big smile on his face.
I then counter
deployed my Grunt castle to look across field at the Briscards. I could actually see two of the link team-
the HRL standing behind the tractor and a prone Briscard just by the stairs of
their building. With an open opportunity
like this, I put my Grunt HMG and Rosie on overwatch so I would be able to get
some double AROs.
My Foxtrots were
on either flank- close to the consoles to get some easy OPs- and my Hardcase
and his ambush camouflage I positioned centre on a gantry to clear out the
central Chasseur (or was it a mine?).
I then placed my
picquets- my Minesweeper remote and Desperado shored up my left flank and a
Blackjack APHMG solidified my back line (and also had a line to the Briscard
sniper to add to the ARO threat).
GAME SUMMARY
TURN 1
MRRF Turn 1

That’s how it
started! The Urugan speculatively fired
on the Grunt- catching him with the edge of the template on a crit! So much for that!

Now with the
inferior infiltrating Grunt out of the way the battle quickly turned to the
midfield.
The Chasseur on my
left flank advanced under the gantry and drew a bead on my camouflaged Foxtrot
hiding next to a console (out of cover).
I didn’t fancy my chances of surviving a surprise shot from camo and
cover, so my Foxtrot dropped a mine for area denial.
Predictably the
Foxtrot was burned to a crisp and to add insult to injury, the Chasseur
shrugged off the mine blast with his next move to the console.
Luck didn’t go all
his way, as he failed the WIP roll on the console with a 17. Contemplating the orders left, the Chasseur
walked back and tried again (successfully this time) and he then ducked behind
some cover.
With that quadrant
cleared out- the Paracommando rifle came on- shielded from any AROs by the
hills. Then moving methodically, the
Paracommando sniped at my Minesweeper REM knocking it out and then picked off
my Desperado who failed his smoke roll.
He (or was it the Chasseur?) then D-charged a scenery piece to pick up a
classified.
It was the turn of
the other flank now and the other Chasseur crept forward. Shielding himself from the nearby Foxtrot
with some terrain he flamed Rosie Munro who was standing over the sandbagged
parapet of the Grunt castle. She made
her ARM roll handily and blasted him apart with her light shotgun.
The Chasseur
minelayer on the garage roof close to Rosie attempted a surprise shot- but by
nature of starting out of cover and with the bonuses of the 5 man link- Rosie
was in a good position to respond. The
Chasseur hit with his rifle, but Rosie’s LRL hit better and burned him to
death. The overwatching Hardcase elected
to reveal in ARO- missed with his shotgun and copped a rifle burst from the
Chasseur and a mine to the face which he didn’t survive.
The Briscards in their 5 man link found
themselves in the unenviable position of facing double AROs. The Briscard link leader escaped down the
stairwell with a dodge- winning the face to face. His HRL compatriot behind the tractor though copped
a HMG round as the link activated and was taken out. The Briscard sniper stood up and engaged the
HMG in response and also lost the face to face- and was killed outright as the
Blackjack snapped off a burst.
Turn 1- USA

Mindful of the
mission- my surviving Foxtrot activated the nearby console and made his way up carefuly
onto the garage roof (towards the other quadrant’s console).
The Dozer and the
Xenotech moved into the quadrant controlled by the Grunt castle and placed the
multiscanner.
With an OP on the
board now, I brought on Van Zant behind the green cargo container and shot down
the Chasseur on my half of the board (who was facing the wrong way). It wasn’t at great range and the camouflage
made a difference! It took several orders
to do and with not a lot of orders left, Van Zant then crept forward and gunned
down the Briscard paramedic (who was also facing the wrong way).
I contemplated
ramboing VZ further- challenging the TR Urugan but I didn’t facing losing him-
so I just put him in suppression.
With two quadrants
each- it was 2-2.
TURN 2
Turn 2- MRRF
The MRRF had taken
some serious damage but weren’t out of the fight. The Urugan started the exchange by
speculative firing onto Van Zant who managed to dodge his way out of the face
to faces where the Urugan landed its template.
Tiring of that
game, the Paracommando moved into a covered position and rained fire down onto
Van Zant where he had no cover and put him into a dogged state- doomed to die
at the end of the turn.
One the Briscards
stood up to try and kill my Foxtrot before he could reach the console on the
garage roof. A flurry of ARO’s followed
from Grunt castle and the Foxtrot- forcing the Briscard to split burst. Rosie- who missed in ARO - was knocked
unconscious. The Foxtrot though critted
the Briscard with his roll though and knocked the Briscard down.
Turn 2- USA
I moved my Foxtrot
on the garage roof to the console and made his WIP roll to secure another OP.
Now I had to clear
out that annoying Paracommando. I had
moved my Blackjack into my main pool for this purpose and he slowly made his
way into a firing position burning most of his orders to do so…. 4-2MOV is
sloooow!
There was brief
exchange of fire and the Paracommando survived one hit and ducked around the
truck trailer he was hiding behind. I
burned my last few orders in the main pool, moving the Blackjack into a better
position and heavy pistoling the Paracommando to death.
I walked on my
Airborne ranger over Van Zant’s corpse to try and contest that quadrant
(again)- but it wasn’t enough to tip the points into my favour.
TURN 3
Turn 3- MRRF
TWith that done,
the remaining Chasseur mine layer, positioned on the central gantry, revealed
to shot the Blackjack in the back. A
flurry of AROs followed from the Foxtrot and the Grunt castle. When
the firing stopped, the Chasseur was dead and the Blackjack was left battle
ravaged, but still standing.
The French Dozer
led his Xenotech into the quadrant they still controlled and placed the multi-scanner
for another OP.
Turn 3- USA
It was time to
maximize points and the last Foxtrot moved over to untouched console on my left
and flicked the switch.
I had edged ahead
on Quadrants these last 2 turns, and with 3 consoles flicked to the MRRF count
of 1- I had eeked out a minor victory.
Result- Minor Victory
Actually it was a major- as my Xenotech should have
scored points for the other two rounds he was in my dominated quadrant. But I didn’t read that part carefully and
thought it was for the last round only and tallied the points as 7-3. Should have been 9-4.
Yes… I’m still kicking myself.
DEBRIEF- KEY LESSONS
Fix
-
Read the mission!
o
Missed
out on 3OPs as my Xenotech was in my dominated quadrant for 3 turns and I only
counted the extra point for the last turn.
o
Should
have been a major victory
o
In
future, highlight and annotate
-
Better way of tallying OPs as they aggregate during the game
o
Both
the opponent and I were trying to work things out on paper at the end of the
game- which leaves room for error
o
Two
big D6s (like in GMG) could go a long way to help with the visual cuing
o
OR a
tally sheet that we update at the end of each round
-
Foxtrot deployment
o
Left
most- poor deployment- leaving him open to attack with no cover
o
Should
always aim for cover- and the nearby hill, prone- would have provided total
cover from the front and still cover from the flanking Chasseur
Sustain
-
Good castling
o
SSL2
and FDL1/2 Grunts/ Rosie
o
Able
to multi-ARO the exposed Briscard link and Chasseurs on the rooftops/ gantries
-
Infiltrating Grunt
o
Good
position- unlucky face to face versus the speculative fire
-
SHOCK ACTION/ OODA
o
Surprise!
§ VZ
§ AR… can’t be helped- planned well but…
o
Size
for disproportionate effect
§ Inf Grunt
§ VZ
o
Zheng/Qi-
Foxtrots do the work, Grunt team does the hard distracting.
o
Disorientation
and disruption
Improve
-
Killing the Xenotech Controller
o
Deny EN OP/ penalize EN OP
o
VZ
challenge the Urugan and then get access into the back line to kill the Dozer
to slow down the Xenotech?
§ B3 13s vs B3 10s- not great odds
§ Better as distraction and order sink
o
Consider
IDF in list?
Mission 4- Transmission
Matrix: EN STEEL PHALANX
Mission Synopsis
-
EACH
GAME ROUND
o
Dominate
same number of Transmission areas – 1 OP
o
Dominate
more- 2 OP
-
Kill
Designated Target- 1 OP
o
Use
Data tracker- extra 2 OP
EN: List
Entomarchos A-
Phoenix, Hector, Myrmidon x2
Entomarchos B-
Thrasymedes, Thorakite LRL, Thorakite FO, Thorakite SMG
Probot
Dactyl + 2 helper
bots
Netrod x2
SP win LT- pick
deployment side (best cover) and forcing me to deploy first.
FR: LIST
-
Bateman
300 ITS_10
DEPLOYMENT
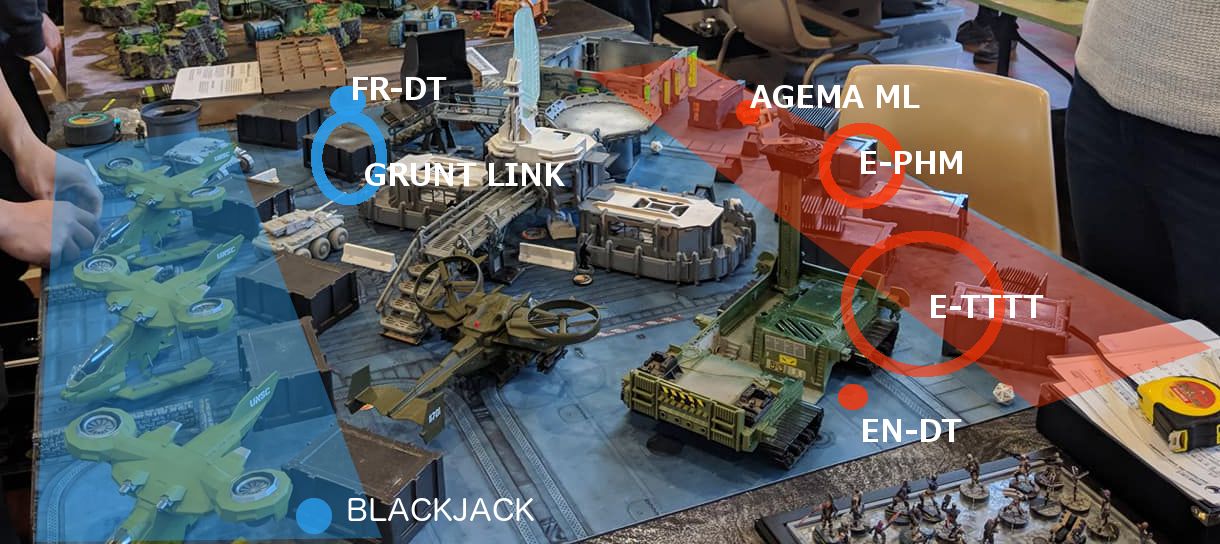
USA Deployment
Spent far too long
on deployment (45min!).
Infiltrating
Grunts both failed their rolls. When
they don’t stick, I know it’s going to be a hard game.
Grunt Link- spent
heaps of time unable to find a castle and had to test silhouettes around the
far containers to make sure no AROs.
Designated target
placed out in the open (I was unaware that the HVT was in fact a DT).
Blackjack placed
behind container (not prone)- not that smart a move. Note diagonal lanes of fire cutting access
from Blackjack moving up that flank.
SP Deployment
Entomarchos A-
well back and centre. Phoenix covering
diagonal approach of the Grunt link.
Entomarchos B-
back corner- protecting EN Designated Target.
Agema- smoke MSV2
ability- sited well back to beyond 32” HMG range and reserve model to counter
deploy against my Blackjack.
EN DT-
intelligently placed in total cover behind the landcrawler.
GAME SUMMARY
I didn’t read the
mission (assumed it was ITS 7) and had placed my HVT out in the open- allowing an
easy turn 1 kill and 3 points down.
Doubly injurious because if I had read the mission and points scoring, I
would have changed my lines of operation- with main effort on the BJ to kill
the EN HVT (actually reasonably close)- and with supporting Line of operation
of VZ to come on and kill the Agema ML blocking the BJ.
As it was I spent
all my time chasing Phoenix around with a HMG, losing all my F2F or only
winning marginally and having him pass his bloody armour saves. I eventually put a wound on Phoenix but he
went into NWI and hid away.
My Blackjack found
himself badly out of position on that flank.
Too far away to get an angle to his nearest target (a Thorakite) and his
usual movement hindered by the Agema ML at my bad range. After burning 4 orders, the Blackjack managed
to get a bead on the Thorakite but failed to kill him. Failed one F2F and the then the second only
landed one hit which the Thorakite shrugged off.
The rest of the
game was a write off as Hector and Phoenix either smoked their way to safety
and then blew apart my army piece meal.
With my turn 2 I
realized the importance of the EN DT and my Blackjack data tracker having no
access to it!
With that in mind
I brought in Van Zant who killed the Agema (eventually) and took out a
Probot. He also put shots onto Hector
who passed all his rolls and flopped prone behind the body of the Probot.
I should have shot
the Probot down and continued to blast Hector- but not thinking smart (I was on
tilt) I wasted 2 precious orders skirting VZ around and getting tangled in a
firefight with a Myrmidon in cover. (ODD
in cover… I’m never going to win on 3 dice).
With that wasted
opportunity- not being able to put SP into LOL- I compounded it with an order starved,
poorly positioned Blackjack managing to target Hector in his back arc and blowing
the opportunity. I rolled 3 hits (one a
crit!) but Hector handily passed the remainder of his ARM rolls and guts’d away.
By this stage I
had wasted too much time and after a quick chat with my opponent- we decided
she would play her second turn to max out points and then we’d call it there.
I took far too
long thinking about deployment and we both spent a lot of time deliberating
moves. As it was I no chance to pull it
back with a Hero run- which to be fair had a very low probability of success
anyway.
RESULT- MAJOR LOSS
DEBRIEF
FIX
Where do I start
with the debrief?
Read the bloody mission! And highlight and annotate.
-
Put
the HVT completely out of view on a flank.
Always.
-
This would
subsequently heavily influence the EN deployment- may force them more forward
and easier to get to???
-
Also
reading the mission- knocking out the HVT= 3 points-
maybe Rosie could have been a better datatracker/ assassinator (FD Level
2). Flows onto whether she should be
linked? I’ll talk about this DT killing
missions later.
TERRAIN- Elevated covered walkways allowing plunging
fire are for HMGs
-
use
them and deploy like you’re going to use them.
-
Grunt
HMG.
-
BlackJack
Time to Deploy
-
just
took far too long
-
hurt
me in the end without being able to play a third turn
VZ should just shoot robot corpses to get better views
onto targets.
SUSTAIN
Using silhouettes to test positions
-
Good
habit
IMPROVE
ODD plus cover is pretty much unbeatable for Ariadna
-
5x 8s of linked HMG is as good as it gets
and Phoenix hits on 13s.
-
Initially
I thought 5 dice would compensate- except for when it’s Steel Phalanx and they
are opposing with 2!
What is the answer
to the ODD in cover conundrum (especially when your Grunts don’t stick their
inferior infiltration)?
1. AVOID.
Don’t waste orders going F2F except under dire circumstances.
2. If you want to
F2F- probably put those 5 dice against a Myrmidon chain rifle/ pistol. They will typically smoke.
3. Spec fire.
4. Spend your time taking apart the ARO piece
covering the BJ and then hitting the Thorakite.
They are ARM 3 but at least don’t have ODD (except for Thrasymedes). In which case, killing two Thorakite by FO/
guided, spec, or direct F2F is priority.
So with those
initial knee jerk reaction thoughts aside- I’m going to be more systematic in
my review of Steel Phalanx in this game.
EN Analysis
COG: Entomarchos A-
Phoenix/ Hector/ Myrmidon x2
CC:
-
ODD-
unbeatable active and practically unbeatable reactive (when B2)- even with B5.
-
Thorakite
360 visors- always F2F at B2 (when linked).
-
Agema
ML- smoke/ MSV
-
High
mobility with smoke cover (which will almost always go down).
CV:
-
Low
orders/ high cost
o
Can’t
be everywhere at once
o
Vulnerable
to being picked off
o
Suffer
from attrition quite badly once they start taking hits
COA
-
I
tried to go head to head with COG: EntA- and failed (didn’t recognize CC-ODD +
Cover + B2)
o
Should
have tried to avoid Phoenix entirely.
o
Failed
to use the essence of maneuver
Proper COA should have been
to “attack EN strategy by conserving own force”- starve EN of orders and get
board control
Revised Lines
of Operation
These probabilities were all determined using the Infinity Dice Calculator (which I am assuming is a validated tool).
1. LoO1- Defeat MSV2 long ARO to allow FR mobility
Best counter to
Agema would be (in descending order):
1.
B5 at
good range and cover
2.
Surprise
Guided in good range and cover
3.
B3
sniper at good range and cover
4.
B5 at
bad range and cover
5.
VZ is
a special case… I would rather save VZ for the Thorakite link once one of them
has been taken down.
2. LoO2- Prioritise Non-ODD FIRST
-
take
out Thorakite link- (B5 best here) to attrit orders
-
HMG-
utlitize terrain to advantage (Thrasmydes has LRL- -3 >24”. Therefore in cover: 2x 8 or 9s (-6), vs 5x
8s. Still risky!!!
-
Better
to chop away at the Thorakite first. MUST KILL 2 Thorakite FIRST to reduced
Thrasymedes to B1!!!
Summary of Entomarchos-Thrasymedes
-
Don’t
even try
-
B5
Linked HMG (best USA can get) is 50:50 too risky for one model
Summary of Solo-THRASYMEDES
o
Linked
B5 HMG from cover- even at 24” is good odds
o
Failing
that- BJ HMG from cover- even at 24” is average but will take more orders
o
Solo
HMG from cover at 24” is 50:50 but very inefficient
o
Surprise
FO/ Guided- hopeless, don’t bother unless in extremis
3. LoO3- Defeat Entomarchos A (Phoenix/ Hector/ Myrmidons)
-
only attempt
this once those previous LoOs achieved.
o
Kill
one Myrmidon first (one wound and breaks SSL2)
§ high burst or template
§ they also likely respond by throwing smoke
(non lethal to active)
o
Then
Hector- no ODD
o
Then
Phoenix last
SUMMARY- REVISED STEEL PHALANX COA
-
PLAY MISSION-
read and annotate- max points!
-
Defeat
dedicated ARO pieces with no ODD (Agema/ Atalanta)
o
B5 HMG
(good range/cover) > Surprise FO/ Guided > B3 sniper
-
Defeat
Thorakite Entomarchos
o
Kill
two Thorakite
o
Then
Thrasymedes at B1
§ B5 HMG > B4 AP HMG > B4 at good range
(v inefficient)
-
Maneuver
and defeat Phoenix entomarchos.
o Kill Myrmidon
first to negate SSL2
o
THEN
§ Maneuver- FO/ guided
§ Attrition- Mobility for angles (unopposed rear
shots)
o
Attrition
last resort
Mission 5- Decapitation-
EN: Nomads
Mission
Synopsis
-
Kill
more Army Points- 2 OPs
-
Kill
Lieutenant
o
Kill
same number 2 OPs
o
Kill
more- 3 OPs
-
Kill
Designated Target- 2 OPs
o
With
Data tracker (extra 3 OPs)
EN:
List
Kriza Mk12 Lt. 360 Visor
Tsyklon Fueurbach 360 Visor
Hollow Man ML
Moran with Krazy Koalas
Zero minelayer
Zero minelayer
Jaguar ADHL
Jaguar
Daktari with x1 helper bot
Mary Problems
REM- Flash Pulse
REM- combi rifle
FO
Tomcat FO
FR: List
Bateman_300_ITS10
I lost the
Lieutenant roll off and Nomads elected to go first.
I picked
deployment side with the most protected corners and made the Nomads deploy
first.
DEPLOYMENT
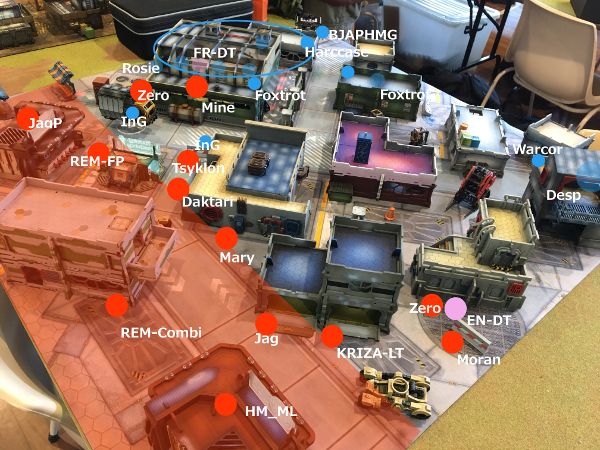
Nomad
Deployment
The Hollowman
missile launcher took up position on the roof of a corner restaurant. The Jaguar Panzerfaust took up position on
the other restaurant on the other flank.
The Kriza was
placed in a position of total cover, whilst the Tsyklon and Mary Problems
assumed the centre position.
The two Zero
minelayers guarded the flanks- one of which was positioned protectively around
the Designated target. And finally, a
Moran with its Krazy Koalas joined him.
USA Deployment
Luck went my way
and my two infiltrating Grunts made their rolls!
One was directly
facing the Tsyklon (and Daktari behind it) and the second Grunt landed behind
the Hutton delivery truck- squarely facing off the camouflage marker adjacent
to the garage.
My priority was in
deploying my Lieutenant and link team and Designated target completely out of
view of the Hollowman. The height of the
Warsenal garage would offer a good degree of protection from super-jump ML
shots and I hid my link team there. As
an added defense against the inevitable air drop, I had my Grunt Lieutenant
prone on the roof just behind the garage and assigned him a Hardcase bodyguard.
Utilizing the FDL2
skills- I put Rosie of the link team on the corner of the Garage- able to draw
lines of fire to the nearby camo marker and the Jaguar panzerfaust (or was it
ADHL?). Either way some hard choices
were going to be made by the Nomad player.
I reinforced the
area around my Grunt castle with the rest of my force-including my Blackjack
who I made my Data-tracker.
The far flank- I
placed the Desperado in total cover- and a Warcor to send out flash pulse
AROs.
GAME SUMMARY
TURN 1
Turn 1- Nomads

The game started
with the Nomads dealing with the infiltrating Grunts. The Jaguar on the rooftop successfully glued
the most threatening Grunt but took two hits from Rosie Munro and was burned to
death.
Thinking a nit
more laterally, the nearby flash pulse REM engaged the other Grunt hiding
behind the Hutton transport truck but took a pistol shot ARO and was knocked
out.
Mary Problems took
up the mantle and clambered her way to the roof of the old garage and fired
down on the Grunt with her SMG. I didn’t
fancy my chances of shooting back against ODD in cover and dodged-
successfully- back behind the truck and out of view. Now with the Grunt well exposed, the Tsyklon
moved into a better position (out of heavy flame thrower range) and critted the
Grunt into unconscious.
The Zero minelayer
facing Rosie’s link team dropped a mine and ducked back out of view, hoping to
stymie the future Grunt advance.
Unluckily, he was well within 8” and out of cover and Rosie’s unopposed
shotgun blasts killed him.
The Hollow Man-
unable to get a bead on any key USA figures- leapt his way across to a balcony
on the central apartment building to get a better ARO position next turn. The Warcor flash pulsed him successfully but
the Hollow Man shrugged it off contemptuously.
The last REM moved
forward and discovered the Hardcase’s ambush camouflage marker I had set up as
a decoy.
Now preparing for
the reactive turn, the Moran set his Koalas to standby mode to protect the
Designated Target and took up position to cover a corner.
Turn 1- USA

The Hollow Man was
out of position and being the key ARO piece of the Nomad force- I made it my
priority.
Still impetuous
orders have to go first and the Desperado sped forward to engage the Moran
double assault pistols blazing. (In
hindsight he should have triggered the Koalas but we thought they turned into
mines!). Either way he lost the face to
face despite rolling 5 dice and was knocked unconscious.
My Airborne Ranger
walked on and fared better- knocking the Moran out.
Now it was the
turn of Van Zant who walked on behind the red roofed restaurant in the Nomad
deployment zone. Sneaking up to the
corner- he engaged the Hollow Man who was facing the wrong way. Naturally VZ only hit with one burst and and
the now wounded Hollow Man turned around hefting his missile launcher. A few orders and several passed ARM saves
later, the Hollow Man dropped unconscious.
That was the key
moment in the game. After that Van Zant
ran amok- gunning down the nearby Jaguar and the Daktari who was facing the
wrong way. He then climbed the roof of
the restaurant into total cover to
threaten the Kriza for the following turn.
My Foxtrot in the
Warsenal Garage, deducing the camouflage markers around him were mines,
MOV-MOV’d to trigger both the mines impeding the Grunt advance and was blown to
pieces.
Free from AROs, my
Grunt link advanced and Rosie fired her LRL at the unconscious Daktari next to
the Tsyklon. The Tsyklon failed its
dodge against the template splash and was destroyed. With Mary out of view, the Grunts took up
position to around the truck and the Warsenal garage to threaten multiple AROs
should she try to advance.
The Blackjack
moved forward to engage the REM staring down the main street and not only lost
the face to face rolls but ended up blinded for it’s troubles.
TURN 2
Turn 2- Nomads
It had been a
rough turn 1 for the Nomads and with not a lot left on the table they had few
options. Clearly Van Zant was the
greatest threat, threatening the Lieutenant and the Designated Target if left
unchecked.
To stop him, the
Tomcat walked on and made his way into Van Zant’s back arc. Utilizing climbing plus, the Tomcat blazed
away with his combi-rifle only to miss with every shot! Phew…. Van Zant passed his dodge and turned
to face the Tomacat. The next face to
face between the two went poorly for the Tomcat and he died to Van Zant’s heavy
pistol.
The Kriza
recognizing the precarious position he was in- ducked into cover by the nearby
buggy should Van Zant try to hunt him.
Mary Problems
tried a long ranged shot through a window at my Designate Target who was able
to dodge. A storm of ARO fire from the
Grunt link team turned her into pink mist.
Turn 2- USA
It was time to
assassinate the Kriza.
I moved a Foxtrot forward
and attempted a surprise Forward Observe (hoping to follow up with an artillery
bombardment). Depressingly, I missed
with both FO rolls and the Kriza subsequently blew the Foxtrot away on the next
attempt.
My Airborne ranger
took out the last Nomad remote and attempted another FO roll which also
failed. He did however pass his ARM
roll.
It looked like Van
Zant would have to be the man of the hour and he stepped up to the plate. It took a fair few orders but VZ eventually
put the Kriza Lieutenant down netting me some OPs.
I had long since
given up on the Blackjack (my datatracker) making it to that side of the board
and killing the EN designated target, and so it fell to Van Zant who knocked
out the designated target with a flurry of dice.
Now moving
slightly to draw a line onto the Zero, they engaged each other inconclusively.
TURN 3
The Zero engaged
Van Zant whose luck held and at the end of the two rounds of fire was still
standing (well actually prone on an elevated position).
With that out of
the way, my Airborne Ranger skirted around the Krazy Koala danger zone and shot
the Zero in the back.
RESULT- Major Victory
DEBRIEF- KEY LESSONS
FIX
Datatracker
-
chosen
at the end of deployment
-
Blackjack-
although survivable- is far too slow and has no IDF
-
Need
IDF for protected EN DTs in missions where killing the DT is required
-
FDL2
would also be very helpful but a well positioned EN DT is protected by mines
and total cover and often too hard to get to (see game 4).
SUSTAIN
Piece Trading
-
Desperado
good option for engaging the Moran in this case
-
(and
also triggering the Krazy Koalas)
-
Would
have opened up the EN DT for the AR
Double/ ARO Placing
-
FDL1
and FDL2 for ITS10 made for excellent ARO options when combined with
infiltrating Grunts who make their rolls
-
Able
to form protection around the DT in this mission
Targeting Unconscious Models To Hit Surrounding Models
With Templates
-
Rosie’s
LRL proved key in taking out the Tsyklon completely risk free
IMPROVE
Remember SSL1 at 8”
-
Rosie was
very effective at taking out the Zero at the Garage corner
-
Should
remember to utilize SSL1 to make future ARO encounters easier
-
More
likely as she is FDL2 and will likely face camouflaged midfield skirmishers in
future
PLAY DISCUSSION
-
READ THE VICTORY CONDITIONS!!!
o
2 minor victories should have been majors
o
My loss could have been mitigated
o
Write
out a mission synopsis before hand to get a good understanding of scoring
o
Highlight
and annotate for the day
-
WAY TOO SLOW
o
set up
the models on the tray better
-
one
tray- ONE LIST of S2s?
-
deployment-
takes too long….
o
Seek
your opponents help in determining LOF into your deployment
o
Better
terrain analysis
§ Observation/ Cover
§ AoA for key figures (ideal for link is
going high and running elevated looking down into the EN zone)
§ Key terrain- deny EN, dominate the board
· This was done very poorly in Game 4
· Central tower- I had easy access and then
had plunging fire down onto the Thorakite and Thrasymedes. Didn’t use it.
§ Vital terrain- mission dependent
-
Appropriate
sequence of deployment
o
Infiltrating
grunts
§ Deny key terrain to EN
o
Camo
markers
§ Hardcase- Deny key terrain to EN/ or
Bodyguard
§ Soft defence (gauntlet)- in total cover
from EN
§ Mobility and elevation for Foxtrots
o
CASTLE
§ CASTLE- cover/ concealment
§ If going first- place next to Avenues of
Approach (in total cover) to get to EN
o
CASTLE
picquets
§ Desperados
§ 112
§ Dozer
o
Reserve
§ Foxtrot LGL if killing EN HVT
§ Blackjack?
§ Grunt LGL if killing EN HVT
LIST DISCUSSION
-
Bateman
300 ITS10
o
Rosie…
§ Situational
§ Often used as an ARO and she’s a crap one
at long range (which is often)
§ Good in game 5- FD L2 means 24” deployment…
great AROs then and she has SSL2.
· Missions she is useful in that respect:
o
Decapitation
o
Firefight
§ Opportunity cost… would rather more
Desperado’s and maybe a sniper.
· Definitely think an LGL is required for
splashing EN Designated Targets
o
Kill
HVT with data tracker
§ HVT is hidden in total cover
§ IDF mandatory for data tracker?- Grunt LGL
(FD 4” +16” = 20”)
· In good range from Turn 1 (terrain
permitting)
· Especially for Decap (5 Ops)
-
Way to
play
o
Two
groups
o
One
Main Effort per turn
§ Achieved by parallel lines of operation-
one in each group
§ Best shown in Game 5
-
When
Did I Use Maneuver Warfare Theory effectively?
o
GAME
1, 2, 3, 5
§ Ambiguity
· Camo markers as soft defense against Uxia
· Camo markers as soft defense against AD
· Gauntlet defense Game 2 against Lizard
§ Novelty
· Infiltrating Grunts
· Infiltrating camo markers especially in
BTV- unexpected
· VZ/ AR
· Shooting unconscious models with rocket
launchers to injure nearby models
· FDL2 Rosie as ARO on midfield- especially
with advanced deployment zones.
§ Deception
· Foxtrot in BTV drawing Lizard into a pocket
to be surrounded by bikers
· Allow link team to skirt and destroy order
pool and isolate the COG- effectively neutralizing it.
§ Fast transient actions
· Bikes
· Game 5 left and right attacks
o
Resulted
in….
§ Disorientation
· EN plan of linear attacks on my force now
very risky braving multiple 2 dice AROs plus camo marker ARO
· EN expectation and preparation for linear
attack on their main force does not materialize but they are attacked on their
flanks/ rear/ Surprise FO (never got that one off this tournament)
o
Game 2
with Lizard
o
Game 5
especially
§ Disrupt
· Splintered efforts- splitting burst to
cover multiple AROs.
o
Going
second and allowing counter deploy with FDL1 and FDL2 really helps get those
angles
§ Overload
· Literal disorientation of the opposing
player (What- you have your Turn 2 to go?
There’s another Turn after this?)
-
When
Did I use Attritional Warfare theory effectively?
o
Any
time I matched up a B5 HMG against a 1 ARO dice target
o
Done
badly in Game 4- went attritional thinking I could 5 dice Phoenix in an
Entomarchos
§ BAD idea vs ODD cover and 2 dice.
o
Badly
with Blackjack as a data tracker
§ Really he’s too slow to get into a good
spot to knock out a DT placed by a good player.
§ Much better used as the stick for TAGs and
HI and not much else???
Awesome!!!!!!
ReplyDeleteThanks for sharing